In the tutorial How I Light My Iray Scene, I describe the common lights that I use in Daz Studio Iray. I render each light into a separate layer and then combine those lights in Photoshop.
Here, I describe the light combination process. In particular, I talk about adjusting light intensities, tinting, and more. Again, I start with the simple Princess of the East image.
In the Princess of the East image, I have the following light layers:
- An IBL light layer using Barcelona Rooftops from sIBL Archives.
- A Key, Back, and Fill layer, following the three-point light system.
- A volumetric spotlight layer.
Step 1 – Control IBL layer intensity
- I open all light layers in Photoshop.
- I go to the IBL light file.
- I right click on the IBL layer and select Duplicate Layer. I rename the duplicate layer IBL.
- I select the Background layer, then go to Edit > Fill, and choose Black in the pop-up box. This should fill our Background layer with a solid black color.
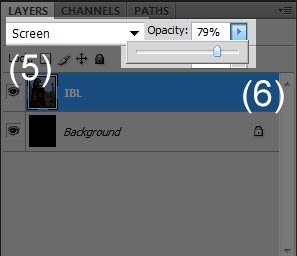
- I select the IBL layer, and set the layer blend mode to Screen.
- Now I can control the intensity of my IBL light by increasing or decreasing the opacity of that layer.
- If I want to increase the intensity of the light by more than its original, then I simply duplicate the layer.
Step 2 – Add in Key, Back, and Fill lights
- I copy my Key, Back, and Fill light layers, and paste them into my working file in Step 1.
- These layers quite often have speckle noise. To remove this, I go to Filter > Noise > Despeckle. I repeat this operation on each layer until most of the noise is removed.
- I set the blend mode of each of these layers to Screen.
- I adjust intensity by changing layer opacity or duplicate the layer, if necessary, similar to what we did for the IBL layer in Step 1.
In this case, I want a strong silhouette to the right, so I want a very strong back light. I achieve this by duplicating the Back layer to double its strength. To further emphasize the strong back light, I weaken the Key layer, by setting its opacity to 30%. I leave my Fill at 100% to lighten my entire figure.
Finally, I also create a duplicate IBL layer and set its opacity to 30%. This allows me to lighten everything in the image, including the backdrop.
Step 3 – Toning, Tinting, and Masks
A few other Photoshop operations that come in especially handy for combining my Iray lights include:
- Changing light tones with the Levels Filter.
- Tinting lights with Photo Filters.
- Lighting areas selectively by using masks.
I illustrate these additional operations using my Luthbelli Classic image. Another useful lighting tip that I use here, is to add another Back light on the left-back side of the scene. In this way, I can add light rims on both the left and right sides of my figures.
1. Changing light tones with the Levels Filter
I use the same process described above to combine my Iray light layers and control their intensities. In this image, I set my IBL opacity to 50%. When I add in my Key light, I find that it is adding too much light to my figure. In particular, I want there to be greater contrast between the left and right sides of the girl’s face.
To change this,
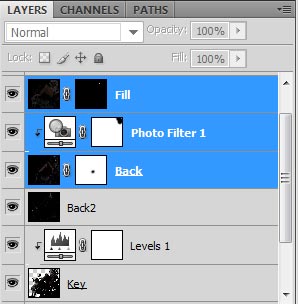
- I select my Key layer, and then add a Levels adjustment layer by going to Layer > New Adjustment Layer > Levels. I make sure to check “Use Previous Layer to Create Clipping Mask” in the pop-up window, so that my Levels adjustment only applies to my Key light.
- I reduce the level of mid-tones in my Key light (0.70), and increase the level of highlights (201). This article has a detailed description of the Levels adjustment filter in Photoshop.
- I add my second back light to get a rim on the left side of my figures.
- The final result is that there is greater contrast between the left and right sides of my pin-up girl’s face.
2. Tinting lights with Photo Filters
To make things more interesting, I add my main back light to the image, and tint it blue so that I get a blue rim around the right of my figures.
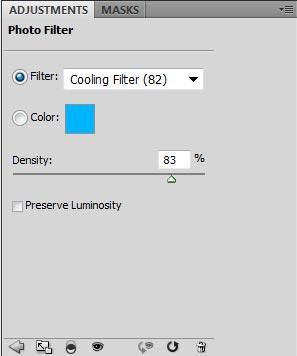
- I do this by going to Layer > New Adjustment Layer > Photo Filter. Again, I check “Use Previous Layer to Create Clipping Mask” in the pop-up window, so that my Photo Filter adjustment only applies to my main Back light.
- I set my Photo Filter to Cooling Filter (82), which is a blue color. I then adjust intensity until I get the right level of blue for my Back light, which in this case is at 83%.
3. Lighting areas selectively by using masks
Unfortunately, I do not like some of the blue highlights in my current image. In particular, I do not like the sharp highlight on the body of the motorcycle and the blue on my girl’s headdress. To remove these unwanted highlights, I can mask them out.
- For the headdress highlights, I just want to remove the blue color. Therefore, I mask out the area in my blue Photo Filter adjustment layer. I do this by selecting the mask layer on my Photo Filter and then painting the area black.
- For the motorcycle body, I want to totally remove the highlight. To do this, I go to my Back light layer and do Layer > Layer Mask > Reveal All. This creates a layer mask for my Back light. I select my layer mask and paint the area I want to remove black.
- I add in my Fill light, but I only mask in the eyes area to brighten my pin-up girl’s eyes. To do this, I go to my Fill layer and do Layer > Layer Mask > Hide All. Then, I select my mask layer and only paint the eye area of my figure white.
Finally, I create a layer with all of my lights combined by doing Ctrl-Alt-Shift-E. I set the layer blend mode to Screen and name the layer All. This allows me to brighten all of my lights. In this image, I set the opacity of my All layer to 50%.
And just like that, we are done! In the next tutorials of this series I will discuss my post-work techniques including adding glow, softening effects, creating contrast, and more.


