Quantcast
Channel: Think, Draw, Art!
Viewing all 279 articles
Browse latest View live

3D-Art Contest Winners ~ August 2015

$
0
0

Thank you all for participating in August and congratulations to all the winners of the August Vendor Awesomeness Contest!

September is Published Artist month at DAZ3D, so we will be celebrating the vendors here as well. There will be double the number of vendors and also double the prizes! We will be awarding the first set of prizes at around the 20th of September, so that you get bucks to spend on Daz. The second set of prizes will be announced at the usual time at the beginning of next month.

So what are you waiting for?! Join the September Double Awesomeness Vendor Contest!!

August 2015 Contest Vendors

Silver
SWAM
Arki
or Arki RDNA

August contest entries.

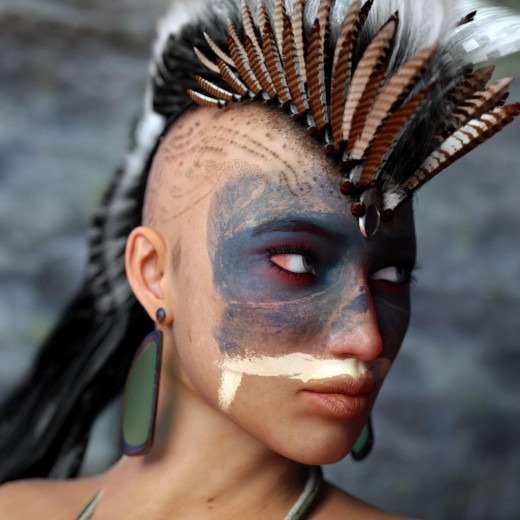
1st Place – Ayashe – Cave 2

Artist – knaakie

Super realistic and so wonderfully done. Awesome looking materials, great looking face-paint, accessories, and depth of field. Arki’s Raven Mohawk Hair looks absolutely fantastic here. I went over to RDNA and downloaded it as soon as I saw this image!

Here is the link for this wonderful freebie by Arki.

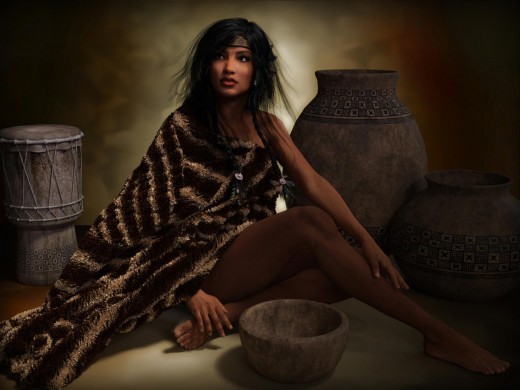
2nd Place – Squaw

Artist – luannemarie

Love it that you combined Kelsie Hair and Wachiwi Hair seamlessly together to make a stunning new creation! Also great scene, pose, materials, and everything else. Creative and beautiful!

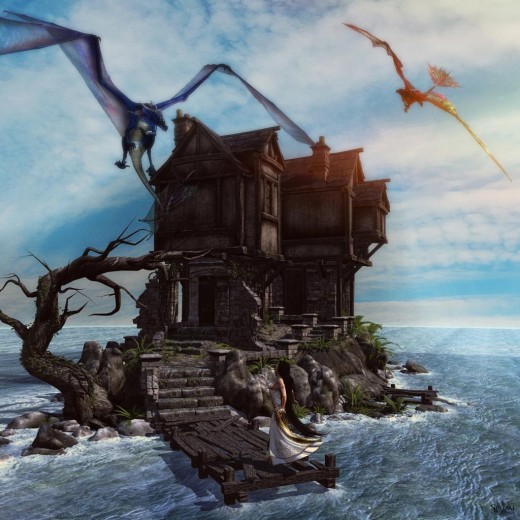
3rd Place – Home sweet Home

Artist – Shozai

What a kick-ass composition! Great integration of so many products by Arki as well as Vyla by Silver, in this stunning scene. The water looks amazing, as does the posing and colors. If this were a book cover, I would buy the book. Fantasy at its’ most awesome!

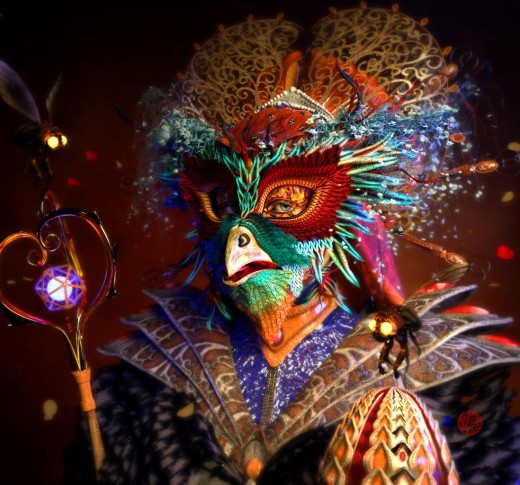
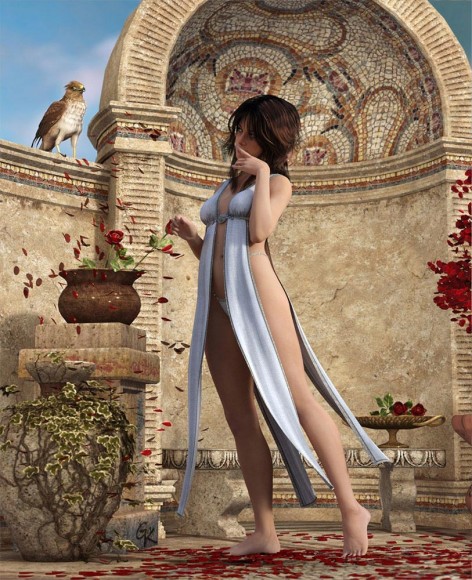
3rd Place – Owl Queen

Artist – Tetsuwan Atom

And we have a 3rd place tie this month! Just a wonderful integration of Arki’s products into an amazing and creative portrait. The colors and materials are magnificent, in this very eye-catching piece. Would make an amazing promo image!

Honorable Mentions

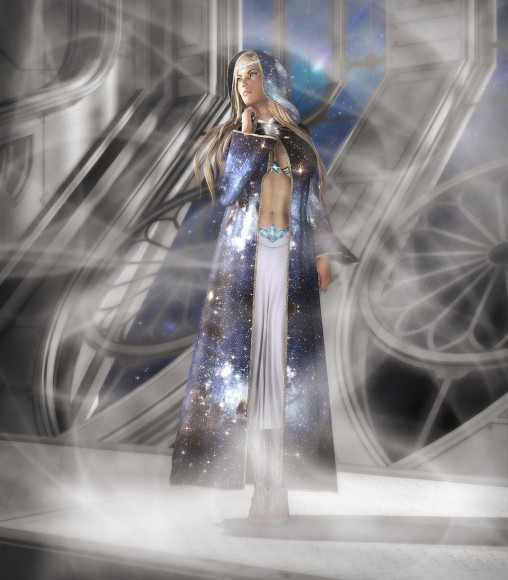
Celestial Advisor by reserv888

Wonderful effects, pose, and a great feature of Aloisia by Silver.

Freedom Angel by Tiger Lee Arts

Superb rendering of an angel, using all of Arki’s products to great effect!

Is it a pigeon? by Lemeya

Beautiful, delightful, and full of grace. An all around wonderful image that lightens the mood and keeps one coming back for more. Mane hair looks just great here!

Congrats and thank you all for participating!!

Winners, please post a comment below with a valid e-mail in the comment e-mail box. This is what I will use to send you your DAZ GC code.


How to Get Wet Skin in Iray

$
0
0

After seeing Dave’s wonderful wet skin image on the Daz Gallery, I was inspired to try creating a wet skin render in Daz Studio Iray.

Creating wet skin involves three key steps-
1. Making the composition fit. If our figure is to have wet skin, then we want our composition to support that.
2. Making the skin properly shiny. Wet skin is more shiny and reflective than dry skin because there is water on the skin’s surface.
3. Adding water drops on top of the skin. In addition to being more shiny, there will also be some drops of water clinging to the skin, and trailing down the skin.

1. Making the composition fit

First, I create my scene in Daz Studio. Since I want to focus on the skin, I want my figure to be fairly large, and to have a good amount of skin visible. In addition, she should be doing something that will result in wet skin. In this image, I decided to create a dynamic scene, featuring Victoria 7 exercising with weights. Hair is NJA Ponytail Hair, which is one of my favorites. Outfit is Heat Up for G3F and G2F.

Below is the first pass of my composition with regular Victoria 7 skin. Lighting is just with an IBL. At this point, the skin does not look very wet.

2. Making the skin properly shiny

Next, I want to change certain settings on my Victoria 7 skin to make it more shiny. To do this, I select my Victoria 7 figure, and go into Surfaces > Editor. I select my V7 skins and make the following parameter changes –

  • Glossy Layered Weight set to 1.0.
  • Glossy Reflectivity set to 0.9.
  • Glossy Roughness set to 0.4. This can be set lower if we want to increase the wet effect on skin. Setting it too low though, will make the skin look unrealistically shiny. Therefore, tweak it according to personal taste.
  • Top Coat Layering Mode set to Fresnel. Top Coat IOR set to 1.49 and Top Coat Thin Film IOR set to 1.4. Again, Top Coat Roughness can be adjusted according to taste. A lower Roughness value will increase shininess and a higher Roughness value will decrease shininess.

3. Adding water drops on top of the skin

There are multiple ways to achieve this final step. I use a simple technique here, which utilizes the Daz Studio geometry shell.

  • First, I select my Victoria 7 figure.
  • Next, I go into Create > New Geometry Shell. This creates a shell over our Victoria 7 figure.
  • I then select the Geometry Shell and apply the Iray Water shader to it.
  • I go to Parameters > Mesh Offset and set the Offset Distance to 0.001.

In the image above, she looks like she has cellophane wrapped all around her. This looks strange because water on our body does not form an even continuous shell. Instead, we only want certain small parts of the shell to be visible, simulating water droplets.

To do this, I do a search on “water condensation bump”. I download an appropriate black and white water condensation image, and apply that to the Cutout Opacity parameter of my geometry shell. I can then adjust the Horizontal and Vertical Tiles parameter to control how much water there is. I decided to go for the more subtle effect here with water drops that are not overly prominent.

Finally, I also add some mesh lights to further accentuate the shininess of my wet skin and shell.

Another way to achieve water droplets on skin is to use crafted specular maps. This is what is done in Wet Body Geometry Shells by SimonWM. However, this product does not work with Genesis 3 figures because the specular maps are crafted for the Victoria 5 UV, which currently is not compatible with G3F.

This is what I did-

  • I apply the Wet Body geometry shell to a G2F figure (Victoria 6).
  • I select all surfaces on the geometry shell and apply the Iray Uber shader.
  • I set Glossy Weight to 1.0, Glossy Reflectivity to 1.0, and Glossy Roughness to 0.
  • Finally, I can further control the strength of the drops by changing Translucency Weight. A value of 0 has the strongest wet map.
    • This first image has a stronger wet body look, and uses the specular Sweat Rolling map. For contrast, we also use a more subtle wet body look, and the Water Beads specular map.

3D-Art Contest Winners ~ September 2015

$
0
0

Some super great entries this time!

September was Premier Artist Festival Month at Daz3D!! In celebration of PA month, we doubled the number of vendors in the September 2015 contest, as well as doubled the prizes. There were two sets of prizes awarded – one around the 20th of the month and another at the usual time in the beginning of October.

Here are the winners for both rounds of the September Vendor Contest. Congratulations to the winners and hope everyone enjoyed the Vendor Festival at DAZ. I know my wallet is a lot thinner because of it! 😀

September 2015 Contest Vendors

Design Anvil
FirstBastion
Ignis Serpentus
ironman13
RawArt
Sabby
SHIFTING IMAGES

September contest entries.

Round 2 Winners

1st Place – Rules

Artist – Shozai

Such a beautiful detailed piece, full of character and charm. One cannot help but feel lifted by the antics of the animals in the image. Wonderful use of Design Anvil’s Old Oak Tree as well as Grass and Plants to create this magical environment. Great colors, fantastic poses, and an overall awesome composition!

Here are a few more captivating images by Shozai. If you have not visited her gallery, I highly recommend it! 😀

2nd Place – Dragon Cove

Artist – EmotionalOutlet

Dragons playing with crabs. 😀 Just gotta love this!

The pose of the main dragon is perfect to convey playfulness, a bit of uncertainty, and youth. It is often difficult to capture emotion, tell an interesting story, and evoke a strong positive reaction from the viewer. This image gets an A+ in all three!

Awesomely creative and great use of First Bastion’s wonderful environment.

3rd Place – Wingless Dragon Haven

Artist – Penne’s From Heaven

Another creative composition that beautifully captures the bond between human and non-human. The dragon having his head scratched, has absolutely the best expression. You can almost hear her purring. Great combination of Ignis Serpentus’ Prisoner Of War outfit and RawArt’s Asian Dragon.

Honorable Mentions

A Bloodymess by Drakenborg

Superb application of blood on not just the main character, but also on the table, walls, and the little scary implements. Masterful work!

Catch The Mummy by knaakie

Great story-telling and expressions. Love it!

Its A Storm Outside by TrixterMatrix

Excellent rain effects, lighting, and expression. All work together well to convey the mood of the piece. The added red from the Fantasy Cloth Wrap by Shifting Images is a great touch.

Lets Go by luannemarie

Stunning pin-up! Great use of lights and materials.

Round 1 Winners

1st Place – Invasion Earth Failed

Artist – reserv888

Wow! Absolutely love this piece. Very cool composition, the light on water and reflections look awesome, the materials are great, and it shows off First Bastion’s Secluded Shoreline to great effect.

Really hope there is a First Bastion sale soon, because he has some really great environments.

2nd Place – Going Dark

Artist – Storypilot

Always love the light and atmosphere in your pieces. Great combination of multiple outfits from Shifting Images, and wonderful how you converted the sword into a light-saber! 😀

Excellent work!

3rd Place – The Art of Dance

Artist – freespinner

Awesome pose and great use of light to accentuate the shape of Fred and Sabby’s Dayna figure. Especially love the attention to detail on how the fabric drapes over her body.

Simply captivating!

Honorable Mentions

Firstborn by Shozai

Beautiful composition showcasing two big favorites of mine – Dragon’s Tor and Black Dragon by Design Anvil. Love how the baby dragon is coming out of the egg, as the proud mother watches and protects. Awesome!

Guarded Entry by ThatGuy

This image looks like a still from a fantasy movie I would love to watch! Wonderful action, expressions, and a great showcase for Battle Cat and Nox Aeterna by Ignis Serpentus.

Congrats and thank you all for participating!!

Winners, please post a comment below with a valid e-mail in the comment e-mail box. This is what I will use to send you your DAZ GC code.

Top 5 Fantasy Women Outfits for Daz Studio and Poser

$
0
0

Patron Freebie!!

Tier 3+ patrons may download my Iray material presets for these five outfits here.

These are my top five fantasy women outfits, that I use time and time again in my artwork. All five were made for Victoria 4, but I use them for G2F, G3F, and Iray. One of the reasons why I love Daz Studio Iray is because there are so many great shader sets available. With them in my toolset, I can make older outfits, which have Poser or 3Delight materials, look good in Iray.

My favorite shader packs are –

  • Pd Iray Shader Kit 1 by parrotdolphin, for fabrics and PVC.
  • Iray Fashion Leathers by Khory, for leather surfaces of an outfit. I also have the Aged Leathers for Iray pack, but I use the Fashion Leathers one more often.
  • Mec4d PBS Shaders vol.1 for Iray for metals and plastics. There are also standard metal shaders that come with Daz Studio Pro, but this pack has more options and I like the results from these shaders more. Metal is a common material in fantasy clothing, so I use these shaders very often.
  • Ingenious Rock Shaders and Nature Shaders by JGreenlees. These are PC+ Club products, so they are great value for the price. I use these for environment objects, but also for some outfits. They are great for nature outfits and bone parts.

1. Dark Apocalypse: Vermillion Dawn

This outfit by IgnisSerpentus is one of my all time favorites because it is distinctive, bad-ass, and highly customizable.

There are a bunch of styles for the headgear as well as other morphs to help with fitting. In addition, the skirt has a bunch of wind and movement morphs that allow me to create a more dynamic image.

I have rendered it on both 3Delight as well as Iray, and like the results of both. In the desert hunter girl picture I have it fitted to G2F and rendered in 3Delight. In the two images below, I have it fitted to G3F and rendered in Iray.

I can use this outfit to create a bad-ass looking demon girl, a desert hunter girl, or a darker scene with shaman girl and her wolf familiar.

2. Bean Sidhe Outfit

This outfit by kaydream is arresting, alluring, easy to fit, and easy to texture. It is one of the most versatile outfits, that I can use in almost any fantasy scene.

I have used it on a demon girl, sorceress, dragon queen, and more. The outfit is conforming, and fits well on G2F and G3F using autofit.

It is also very easy to shade because the outfit only contains metal and gem/jewel surfaces.

3. Kali for V4

This sexy fantasy outfit by RDNA Pro, Nightsong, Secretheart, & Littlefox is simply fantastic! It combines both highly poseable fabrics, as well as conforming parts of metal and jewels. I especially love the headdress with its long flowing back veil.

Images that I made with the Kali outfit were the first to get me noticed on the Daz gallery, and they continue to be some of my most popular images.

The one fly in the ointment is that the skirt fabric portion of the outfit has its own bones for controlling movement. These bone pieces will not transfer using regular autofit. The back-veil in the headdress also has its own bones, but we can just parent it to the head of our figure, so it is not an issue. The simplest way to solve this problem is to remove the skirt and add on an underwear bottom.

Alternatively, I have tried adding two versions of the skirt figure. One version I conform to my figure, and the other version I parent to my figure’s hips. I then make the skirt surface invisible in the conformed item and make everything else but the skirt invisible in my parented item. This can work pretty well with simple standing poses, but since the fabric portion of the skirt is only parented, it may collide with the figure depending on pose.

There is also a way to convert and preserve the skirt rigging structure. Here is a very short summary of the steps on how to do this, which I got from Sickleyield’s tutorial.

  1. Make sure figure is G2F with no morphs and no poses.
  2. Click on the Scene Tab and select the object (e.g. Gown) we want to convert.
  3. In Scene Tab options select Edit > Rigging > Convert figure to weight mapping, pick Triax.
  4. In Scene Tab options select Assets > Transfer Utility.
  5. Source = G2F/CloneV4, Target = Gown/Current (Remember to set to current).
  6. Uncheck all except Morphs and Reverse Source Shape from Target, check Add Smoothing.
  7. Fit to G2F.
  8. Select G2F, then Gown, and do Edit > Rigging > Transfer Rigging (Figure Space).
  9. Save as > Support Assets > Figure/Prop.

4. Fury

When I first got the Victoria 7 figure, this was the first outfit I tried on her. It is a great looking armor set, with a bad-ass shoulder piece, 9 separate pieces of armor, hair that fits the helmet, and two swords/cleavers.

It has good skin exposure, and is great for fantasy warrior type artwork. It looks even better after applying Mec4d’s metal shaders for Iray.

5. Novariens Holy for V4

This outfit is distinctive, eye-catching, and very versatile. I have used it on fantasy warriors with dragons, on assassins with guns and explosions, and on a sword carrying angel. I have used it in fantasy art, contemporary pieces, sci-fi scenes, and more. I can texture it with leather, creating a softer, lighter, outfit; or I can texture it with kevlar or similar synthetic material, to create a more solid armor.

Although originally created for V4, it conforms well to G2F and G3F. The outfit accentuates the curves of the body, is sensual, and provocative.

Patron Freebie!!

Tier 3+ patrons may download my Iray material presets for the outfits above here.

Hope you enjoyed our top 5 fantasy women outfits. In this article, we specifically focused on top Victoria 4 outfits that we have successfully used with G2F, G3F, and Iray. We will deal with Genesis specific fantasy outfits in future articles.

3D-Art Contest Winners ~ February 2016

$
0
0

January was another busy month at DAZ3D with lots of deals, fun new releases, and over-spending my budget. The biggest news is probably the release of Daz Studio 4.9 and content encryption with Daz Connect. I am currently on DS 4.9 and I am very happy with it, mainly because many of the crashing bugs that I encountered in 4.8 have been fixed. As for Daz Connect, it is not a very big change for me since I already use DIM and have integrated it into my workflow.

There was also the release of Gia7 and Gianni7. I am more interested in Gianni, and I really like how he looks with Finlay Hair.

February 2016 Contest Vendors

outoftouch
Predatron
Valandar

February contest entries.

1st Place – Fatal Promise

Artist – alx

Wow! This one just reaches right out and grabs your attention.

Gorgeous, creative composition, with cool details. Everything fits together exceptionally well to tell the story and convey the dark mood. Fabulous face makeup, eye color, hair, bloody backdrop, and moth on the shoulder. The superb pose not only works well with the composition, but also features Valandar’s Armor Ring to great effect.

Terrific color palette, with the yellow moth contrasting well with the red makeup and blood.

Mesmerizing! Difficult to look away.

2nd Place – Nose On Nose

Artist – Shozai

First of all, a big congratulations to Shozai for being featured on the front page of Daz3D! Her amazing artwork also appears as promo images for Alessandro_AM’s products.

This is another delightful, creative, and heart-warming composition. Everything is excellent, from the beautiful background, to the vibrant dandelions on the ground, and of course the male skunk wooing his girl at the entrance of her log house.

The dandelion flower in his mouth is perfection!

There were so many awesome entries in February that we had a tie in third place.

3rd Place – Rats

Artist – Sasje

Fantastic composition, poses, and lighting. An excellent sinister mood permeates this piece, with marvelous shadow patterns and dark mouse silhouettes. The poses are brilliant, as is the expression of the Behemoth.

Creative, unique, and an A+ on story-telling!

3rd Place – On the Run

Artist – knaakie

Another composition with terrific story-telling, action, tension, camera work, and humor. The posse of Predatron’s Troglodytes are wonderfully posed, and the expression on the thief’s face is priceless. All this is perfectly set against the amazing Magic Cliff backdrop by Aako.

This is a video-game that I definitely want to play!

Honorable Mentions

An Exaltation of Hostile Interests by dvitola

Very creative concept and outfit. Cool use of shadows, and the blue tint gives the piece a very apropos feeling of night-time silence. Excellent work!

Anyone Home? by reserv888

Lovely warm lighting comes from the entrance opening, which bathes the girl in golden color and accentuates the curves of her body. This works well with the colder night light in the rest of the scene. Marvelous use of light and shadow to create mood, anticipation, and tell a story.

Friends by Ferretmania

Beautifully posed, so that the viewer is quickly captured by the special bond between girl and dragon. Great specular highlights on the dragon’s skin, and a lovely showcase of Valandar’s Dragon War Armor and Dragon Queen Outfit.

Snow White by mugzie101

Love the idea of a dominatrix Snow White. Charmingly posed and splendid use of OOT’s Dramatic Iray Lights to get exactly the right girl-with-whip ambiance. 😀

Congratulations to our Winners!!

Winners, please post a comment below with a valid e-mail in the comment e-mail box. This is what I will use to send you your DAZ GC code.

Many thanks for participating and sharing your wonderful artwork with us. Hope to see you in our March 2016 contest!

3D-Art Contest Winners ~ March 2016

$
0
0

The biggest news last month was probably the RDNA merger with Daz. Here is a useful customer FAQ on the nuts and bolts of the merger. As with any real change, it comes with both good and bad. Where one stands on this continuum will also depend on situation and temperament.

There are many things that I will miss from RDNA, including its wonderful community, the gallery environment, the very supportive admins, and the excellent monthly challenges. I have met some awesome people at RDNA, and while I expect to see some of them at Daz or Renderosity, it will of course, never be quite the same.

On the other hand, it will be great to see what my favorite RDNA vendors come up with in their new home. A Terradome for Daz Studio Iray would be totally awesome!

I also want to wish the RDNA admins all the best, as they have always been very supportive and generous to the 3d-art community. Thank you RDNA and best wishes for a bright and successful future. I will certainly continue to support you at Daz. 😀

In other news, March Madness has begun at Daz-land and there are already some great products released. I absolutely love Legacie Hair by goldtassel. It contains multiple different hair pieces and is super versatile. I have even combined it with other hairs, and it looks great both ways!

Therefore, we will try something a little bit different this month. Instead of picking individual vendors, we will just pick the entire March Madness catalog. In particular, images this month must contain at least one item released at Daz in the month of March 2016. It can be any item, even free items that are not part of the March Madness sale.

Images with the newly released Girl 7 and Guy 7 will also qualify.

March 2016 Contest Vendors

Recently Released Items on Daz

Endless Love for Genesis 3 Female(s) and anything released after that, in the list above, will work!

March contest entries.

1st Place – Above the Clouds

Artist – ThatGuy

Marvelous camera work, framing, and motion. The color choices are terrific, with the softer whites and blues, really setting off her red hair. It also pulls the viewer’s attention to her face, which has the perfect expression.

Great use of DecoStrings for Genesis 3 Female(s) and Marble Shaders for Iray.

Balanced, soft, graceful, and awesome work!

2nd Place – Outside

Artist – Budo-san

Great story-telling in this piece, with humor, tension, action, and fun. Fantastic motion and expression on the drakes. The backdrop is beautiful with silhouettes of fantasy style buildings fitting in perfectly with Stonemason’s Japanese Maples. Outstanding bokeh effects to create great contrast and patterns.

A truly impressive scene. I want to know what happens next and I want to see more of this magnificent fantasy world.

We are happy to say that there are two third place winners again this month!

3rd Place – Alien-world1

Artist – scorpio

Masterful transformation of Stonemason’s Fern Lake into an alien landscape. Love the attention to detail on the people poses and vehicle. Terrific colors, and very artistic use of rocks and vegetation to create a wondrous scene.

Fascinating, creative, striking!

3rd Place – Legend

Artist – Jaellra

Superb use of colors, which instantly grabs the attention of the viewer. The soft blue hues of the background complements the warrior woman well, and her steel armor materials as well as warmer skin, makes her stand out.

This eye-catching piece would make a great promo image for Traveler’s Uber+ Iray Antique Metals. Gorgeous fantasy artwork.

Honorable Mentions

Missing Fall Already by Ippotamus

Exquisite scene! Great expression, color palette, and integration of elements. Always love the balance in your compositions. She has a sad expression, which is balanced by the lighter and lovable Tamagotchi-esque creature on her ball. She is an android, but she shows deep emotion, and is set off against a natural backdrop of leaves. And of course, bringing it all together, a common theme that encapsulates all of these contrasts.

Brilliant concept and artwork.

Brandil And The Fairy Princess by VortigensBane

What a charming picture. The first thing that jumps out at me is her wonderful dress, with great draping and materials. The white color and clever use of lace and satin sets her off as the kindhearted and virtuous princess. Then, there are the chains and overgrown environment, which indicates that she has been freed from some kind of magical captivity.

He is the humble, unlikely hero, and she is gracefully thanking him for his bravery and service in freeing her from her bonds. Delightful and captivating!

Priya – The Golem and I by knaakie

Superb scene, materials, and backdrop. It wonderfully captures the relationship between girl and golem. He is her loyal servant, protector, soldier. Unlike the usual helpless princess, she comes across as strong and in-charge, however, she also has a warm and gentle love for him.

Powerful scene and characters. Bravo!

Hideout by Sasje

I love this image. They are all outcasts, but they have banded together to survive. Two of them are on look-out duty, while the others are taking a well-deserved rest. They are a family, even though they may not all be the same. However, they work together for the betterment of all, and are stronger because of it.

This composition really speaks to me. Thank you for sharing it.

Congratulations to our Winners!!

Winners, please post a comment below with a valid e-mail in the comment e-mail box. This is what I will use to send you your DAZ GC code.

We enjoy all your creative ideas and wonderful images every month. Thank you very much for participating and sharing your awesome work with us! Hope to see you in our April 2016 contest!

Top 6 Fantasy Art Environments for Daz Studio

$
0
0

I mainly do figure-based fantasy art, where the humans, animals, and creatures are the main focus of the piece. However, the environment is still important because it needs to complement and support the figure, while not detracting from it.

In this article, I highlight my favorite fantasy art environments, talk about why I like them, and how they help to enhance my images.

1. Skies of iRadiance – High Sky HDRI Bundle for Iray

This set is extremely useful. In many of my renders, I want to just render sky in the background without having to worry about other elements in the HDR image such as houses or buildings, which may not fit well into my fantasy art scene. At other times, I may use a modeled external environment for my backdrop, where a good sky backdrop is also needed. Indoor scenes with windows also benefit from a sky environment map.

It is true that I can add a 2D sky later on in postwork, but using a HDR sky as my environment map will produce consistent lighting, shadows, and reflections.

Alternatively, I may use a skydome prop and make the surface emissive. However, a HDR image is still best because it has a much larger range of values, and can provide us with higher contrast lighting.

Another fun thing that I do with this package is render different sky layers, and then combine them in postwork. This allows me to create interesting sky colors and patterns. For example, the image above uses a combination of DTSol-NightTimeE from Skies of iRadiance – Night Sky HDRIs for Iray, and DTSol-SunsetL from Skies of iRadiance – Sunset HDRIs for Iray.

I use this package with many of the sets that I describe below.

2. Neitherhenge

This environment is arresting, flexible, and unique, with glowing fantasy letters that provide us with great color and lighting opportunities. There are great textures included with this set including bump, specular, and displacement maps. In addition, there is also an ambient map for the glowing letters, so that I can set
the proper parts to be emissive in Iray.

This is not an Iray ready scene, so I had to manually assign some of these textures and increase the bump to make things work well in Iray. However, after I set things up once, I can save it out as a material preset for future use. The fantasy image below shows an Iray render of the Neitherhenge environment.

In addition to Neitherhenge, Orestes Graphics has many more marvelous environments that I frequently use in my images. Many of them share the same qualities of being arresting and unique, with a strong fantasy theme. My two other favorites are Sacelleum of Corlyk and Realm of Krystillum.

3. DM’s Enchanted Hill

Of course, any discussion of fantasy environments must include the works of Danie and Marforno. They have a wide variety of fantasy environments including beautiful nature scenes with large mushrooms, a boot house, superb open-air fantasy structures, Gothic indoor scenes, and much more. In addition, each scene usually comes with a set of superb poses, such as only this talented duo can produce.

It is difficult to pick a favorite from such a high quality store, but the one that I have used most often is probably DM’s Enchanted Hill.

This product comes with several premade scenes, so we can get started with just a few clicks. However, there are also a variety of well-made props that we can put together in any way we want, to create a unique scene. For Iray, I just apply the Uber shader to all scene surfaces.

The accompanying poses are terrific, and I have used the flute playing presets in many of my fantasy compositions.

4. Easy Environments Road to Hell

This is a light-weight environment that loads fast and renders fast. It is especially appropriate for spooky scenes, but I also use it in more general night-time scenes. The set comes with a very versatile floor terrain that has a flat road surrounded by a more craggy/rocky landscape. The flat part is great for posing our figure, while the rocky area makes it interesting, and helps it to naturally meld with the background sky.

There are various tree props that adds to the spooky feel of the scene.

The trees and dark terrain give the scene tension, and help make foreground elements stand-out. In the Red Riding Hood image below, this dark scene not only makes the red of her outfit pop, but also lends the composition some drama. In Iray, I apply the Uber Shader to all surfaces and then make the base color darker.

Flipmode has other cool Easy Environments products, but I use this one most frequently. My next favorite is Easy Environments: Snowy Mountains which comes with Iray materials and render settings.

5. Lakeside Folly

This set is gorgeous! It comes with a water prop and three different Iray render settings for day, sunset, and dusk. I especially like how the environment maps were designed so that the sky seamlessly fades into the water on the horizon (with depth of field). Even without the little house, just the water prop and HDR images make this environment a winner.

For example, in the Fantasy Water Angel image below, I just used the water prop and sunset render setting.

The light setup is also excellent, with several lanterns placed around the little house and small dock, which cast light reflections on the water.

6. Return To The Enchanted Forest

To wrap things up, we have the amazingly talented Stonemason. His environments are always top-notch, easy to use, and loads well in Daz Studio. Whenever there is a good sale on Stonemason’s store, I always load up my cart!

My favorite is probably The Enchanted Forest and Return to the Enchanted Forest. Both sets are highly detailed, loads quickly, and renders well in Iray with just the Uber Shader applied.

I can also remove some trees to create a more open wooded area. For example, in the image below, I wanted the papa and mama moose to stand out more against a lighter sky background, so I simply removed some of the vegetation.

More recently, Stonemason has released the Fern Lake Bundle, which contains two beautiful wooded environments specially made for Iray. I will definitely get these when they come back on sale. They look spectacular!

And that is it for our top 6 fantasy art environments. Hope you enjoyed our picks. Feel free to share your favorite environments with us below.

An Introduction to Daz Studio Octane

$
0
0

This article and all of the images within were created by the very talented Brian Sains. Copyright © Brian Sains. Check out his gallery here.

Why Octane?

I started using Daz just under a year ago now, with no background in art or design.  I run my own business (along with my wife) that specialises in developing communication skills for people with Autism and Learning Disabilities.  It was through my work that I discovered Daz Studio, and was interested in its educational potential for developing avatars that could represent different emotions, expressions and social situations.  I got to grips with the basics and soon developed some resources that were well received, but they were very plastiky and I wanted a little more realism.

I spent a couple of months working with 3Delight, iRay, Reality (Lux), Indigo (via iClone) and Arnold (via a Cinema4d demo), before discovering Octane. While the render engine does play a role in determining the quality of the render produced – I would place lighting, camera settings, more lighting, shader quality and perhaps even post-work above it in significance. 

However, as far as render engines go, Octane appealed to me – it allowed me to stay within Daz, use all of the assets I had accumulated, and most importantly the node based shader/material interface made complete sense to me.  It is also fast – very fast.  I started tweaking and twiddling skin materials about six months ago, and haven’t really stopped since!

In this article, I will introduce you to using Octane from within Daz Studio, along with the tools and settings you will need.

Octane Renderer

Octane is, like iRay, a Physically Based Renderer (PBR).  My understanding of this is that the engine accurately simulates the characteristics of light and it’s interaction with a variety of surfaces. In particular, simulated light bounces around a simulated environment hitting simulated surfaces until it hits the lens of a simulated camara.  This article does a great job at explaining the Basic Theory of Physically-Based Rendering.

There are two ways of using Octane with Daz Studio – through the standalone Octane Render Software or the Daz Integrated Plugin.  There is very little to separate them regarding the tools available or the quality of what is produced, but the Daz plugin is infinitely easier to use. You make an adjustment in Daz, it is updated in the render preview in close to real-time.  If you do not have a licence of Octane, a trial version is available for standalone and plugin versions (www.otoy.com).  I use the 3.0.6 beta version, but the tutorial will work just as well with the stable 2.24 version.  In terms of hardware I am using an 8 core i7 5960x, 32gb ram, and dual Titan X GPUs, though it will work quite happily on more modest machines (I started on an old Macbook pro).

Once installed, you can access the plugin from within Daz via the OctaneRender Main link in the Render menu, or use the toolbar icon (see below).

To get started, you need to be familiar with the Rendersettings, Environment, and Materials tabs.

Octane Render Settings

Dimensions

Set the dimension (in pixels) of the render image.  A number of commonly used ratios are available, and will be familiar to iRay and Reality users.

Kernel Settings

Octane has 4 different Kernel types for processing renders. I tend to always use PMC, though path-tracing is sufficient.  PMC is the most processor intensive, and would normally only be used when things like caustics are involved, but I prefer the result.  I rarely touch the kernel settings except when there is a seam visible between the forehead and scalp – then reducing the value for Ray Epsilon can help.

Max-sample allows you to set the maximum number of samples that will be calculated before the render pauses.

Imager settings

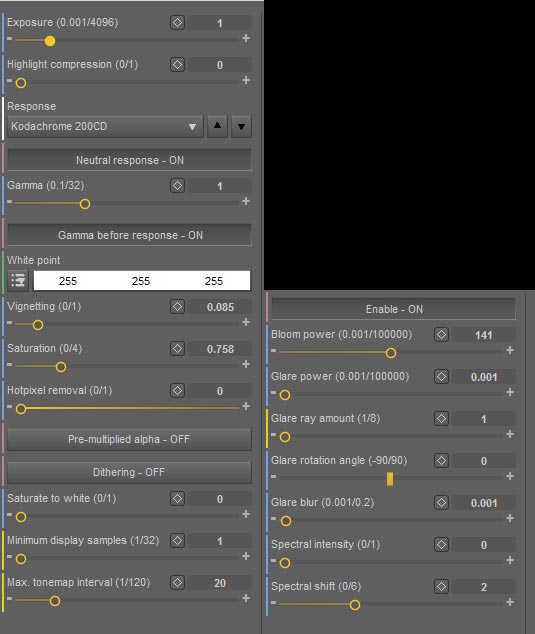
A selection of filters that simulate the colour and tone of common cameras.  By default this is set to Linear.  I tend to use linear when I am setting up the scene and then Kodachrome or Agfachrome curves. The contrast they provide helps lift some of the finer details in the skin, such as pores and blemishes.

Octane Environment

Here you can choose between the Octane generated daytime environment (left) or HDR texture environment (right).  You can also select to have a greyscale or RGB environment. 

To set up a HDR image make sure RGB image is selected in the dropdown box on the right and then use the browse bar in the middle to locate the desired image.  Do make sure the Gamma is set to one.  Once in place you can transform the image using 2d or 3d controllers.  I will cover this in greater detail in the next tutorial.

Octane Materials

This is where you assign materials (shaders) to your model within Daz.

  1. Available materials (Used in this file, saved as presets, or from live database)
  2. Selected model and available surfaces (blue – no material, white – material assigned)
  3. Selected material properties
  4. Nodegraph editor – opens the material editor in node view
  5. Open viewport – opens the render window

To create a new material either:

  • Drag it from the used or preset area to the desired surface (you can use the same material on multiple surfaces)
  • Right-click the material and copy as new material. The new material will be an instance of the original but can be edited. Then drag the new instance across.  This is very useful when setting materials for skin.
  • Search the Live Database (not available in demo) – then drag that over to desired surface. This material will then be downloaded from the internet and applied. Materials from the database can be edited/saved as presets once downloaded
  • Right click a surface window (2 in diagram), and select either:
    • Generate as new material > blank – will create a new blank diffuse material.
    • Generate as new material > auto – will take the existing material settings applied within Daz and try to create a suitable material. You will normally need to tweak these auto materials, particularly if they are based on iRay shaders in Daz (though this is improving with newer releases).
    • Generate as new light source – will create a new blank diffuse material set up as a simple, textured, or IES profile light emitter.

To edit a material either;

  • Adjust settings in the right hand window (3 in diagram). This is suitable for minor tweaks.
  • Select the node-graph editor (4 in diagram).

Below, I show the nodegraph editor (or NGE) with a simple diffuse material.

Next, is the node-graph of a more complex skin material. 

Octane has four primary nodes:

  1. Diffuse – solid material surface,
  2. Glossy – solid shiny surface,
  3. Specular – clear or transparent surface, and
  4. Mix node – combines two or more of the previous surface nodes.

Nodes are available from the pull-out list on the left, can be dragged into the main viewport, and then edited on a node-by-node basis on the right.  It may seem a little daunting for anyone unfamiliar with node based systems, but this is by far the easiest way to manipulate materials in Octane (and in my opinion within Daz also). 

Once you become familiar it is very versatile and can lead to a multitude of new ways for generating materials; for example generating a greyscale image using a noise generator, mixing it with a turbulence generator and using the result instead of a bump map for variation on a the skin surface.

Other nodes are available for setting colour, placing images, generating procedurals (like noise), manipulating uv projections, setting displacement, setting emitters and so on.

Once nodes are placed they can be connected using the colour-coded terminals.  This is very useful when new to the NGE, as you can’t plug something in where it can’t be used.

It may also be worth referring to the online manual  for more information.

Octane Render Viewport

The final part of the plug-in we will explore is the viewport.  This is where you render the scene, as well as fine-tune some of the settings.  For example, you can:

  • Set manual or autofocus
  • Limit render to a selected region
  • Adjust kernel settings
  • Adjust camera settings
  • Set post-processing (like bloom)
  • Adjust environment settings
  • Generate additional render-passes
  • Save final image

Again, I will go into a lot more detail with using the viewport in the next tutorial.

Summary

Now that you are familiar with the core functions and tools within the Octane Plugin, we can move onto setting up a scene based on my Mei image.  In the next tutorial I will set up the scene within Daz Studio and cover lighting, camera, and setting materials.


Check out the wonderful art of Brian Sains.


3D-Art Contest Winners ~ April 2016

$
0
0

Wow! March Madness was just crazy good this year. There were a bunch of great items that I really loved and some terrific deals. We are also beginning to see a bunch of RDNA items appear in the DAZ store. In fact, some of the best deals in March were on these items, many of which had multiple stacking discounts, so they were priced at $2-$5. Hard to pass up on a deal like that!

I was actually hoping to hold back some in March, but unfortunately, that didn’t happen. Based on the March contest entries, it looks like the popular items used include –

Originally, I was going to feature these three great vendors for April. However, it looks like Goldtassel and Valandar were very recently picked, so I had to switched things up a little bit. I added in RuntimeDNA’s Daz store and DzFire, because of the fun April’s Fool joke that Daz played on us today with V8. 😀

April 2016 Contest Vendors

DzFire
RuntimeDNA Daz Store
Stonemason

Images with the newly released Izabella 7 will also qualify.

April contest entries.

1st Place – Morning Haze

Artist – Ippotamus

Absolutely love this piece! Excellent story-telling, composition, and render.

My eye is first drawn to the lantern on the pier, … there is a map! What are we looking for? A cure, some treasure, a new home? We see the ships sailing away into the haze, into an uncertain future. But there is hope, because there are always lights to illuminate our way.

A very creative use of RDNA’s Star, which together with the fantasy boats, adds a whimsical feel to the image.

All the materials look great, the water and haze are wonderful, and the accents from the warm lights are perfection. An amazing piece of art.

2nd Place – Immortal Fighter

Artist – Drakenborg

A marvelous dynamic image, blending the old with the new, fantasy with sci-fi, as well as Eastern with Western. It creates a fabulous showcase for Stonemason’s Streets Of Asia 3 and Sci-Fi Bedroom.

I especially love the movement of the character and hair, as well as her outfit, which encapsulates this blending of different elements, and yet appears as a seamless whole. Wonderful concept and marvelous use of colors and materials in its execution.

There were many great entries in April (thank you all so much for participating), so the judges had another tie for third place.

3rd Place – Gang Activity

Artist – Joe Webb

Fantastic camera work and tension!

I especially love the clever use of shadows to increase the threat presented by the armored swordsman. Light bathes the current action portion of the scene, which is where our eye is drawn to first. But then, we notice the fallen man in the shadows, and realize that his brave comrade is standing ready to protect him.

Great details with the dropped sword and hat on the floor, as well as the broken crockery.

The walled in lane from Stonemason’s The Streets Of The Mediterranean helps to increase the tension of the image, and the light is superbly placed to cast shadows in exactly the right place. A brilliant example of using the environment to help capture story and mood.

3rd Place – Curious Look

Artist – Shozai

Who would not fall in love with this image! AM’s Raccoon is wonderfully emotive and adorable. The little fella is cautious, but he is also curious and perhaps looking for some adventure.

Amazing textures on the bark and everything else. I like the use of the gray bark, which helps to camouflage the hiding raccoon. However, the gray also sets the foreground elements apart from the rest of the greenery.

A terrific image from an outstanding artist.

Honorable Mentions

Grounded by Alx

Excellent concept and great use of Stonemason’s Dirt Shaders to give her outfit a battered and battleworn look. The grave mood of the scene is further enhanced by the environment, darker lighting, expression, pose, and smoke effects.

Absolutely wonderful how everything works so well together to draw the viewer into her story.

Let there be light … by Lemeya

A creative and delightful composition featuring RuntimeDNA’s Lumen Tenebris front and center. It looks like both sprites are in a contest to get to the light, which makes the item even more desirable. In addition, the beautiful colors, background, and mist, make this into a clear winner!

The Evening Flight by EmotionalOutlet

A gorgeous composition rendered in Vue.

I have always wondered about the complexity of porting Daz Studio assets into Vue, so it is great to see that the materials from Stonemason’s The Streets of Tuscany transfer so well. Beautifully put together and rendered.

Thank You and Congratulations!!

Winners, please post a comment below with a valid e-mail in the comment e-mail box. This is what I will use to send you your DAZ GC code.

Thank you all so much for sharing all your wonderful ideas and artwork with us. You are all totally fabulous! See you in our May 2016 contest!

How to Create Realistic Skin in Daz Studio Octane

$
0
0

This article and all of the images within were created by the very talented Brian Sains. Copyright © Brian Sains. Check out his gallery here.

We will need a working version of the Daz Octane plugin installed (full or demo).  This can be downloaded at www.otoy.comPlease note – if you are using the demo version then image size is restricted and will be watermarked, and you will not be able to access the material database. If you are not familiar with Daz Studio Octane, this introduction article will give you an overview.

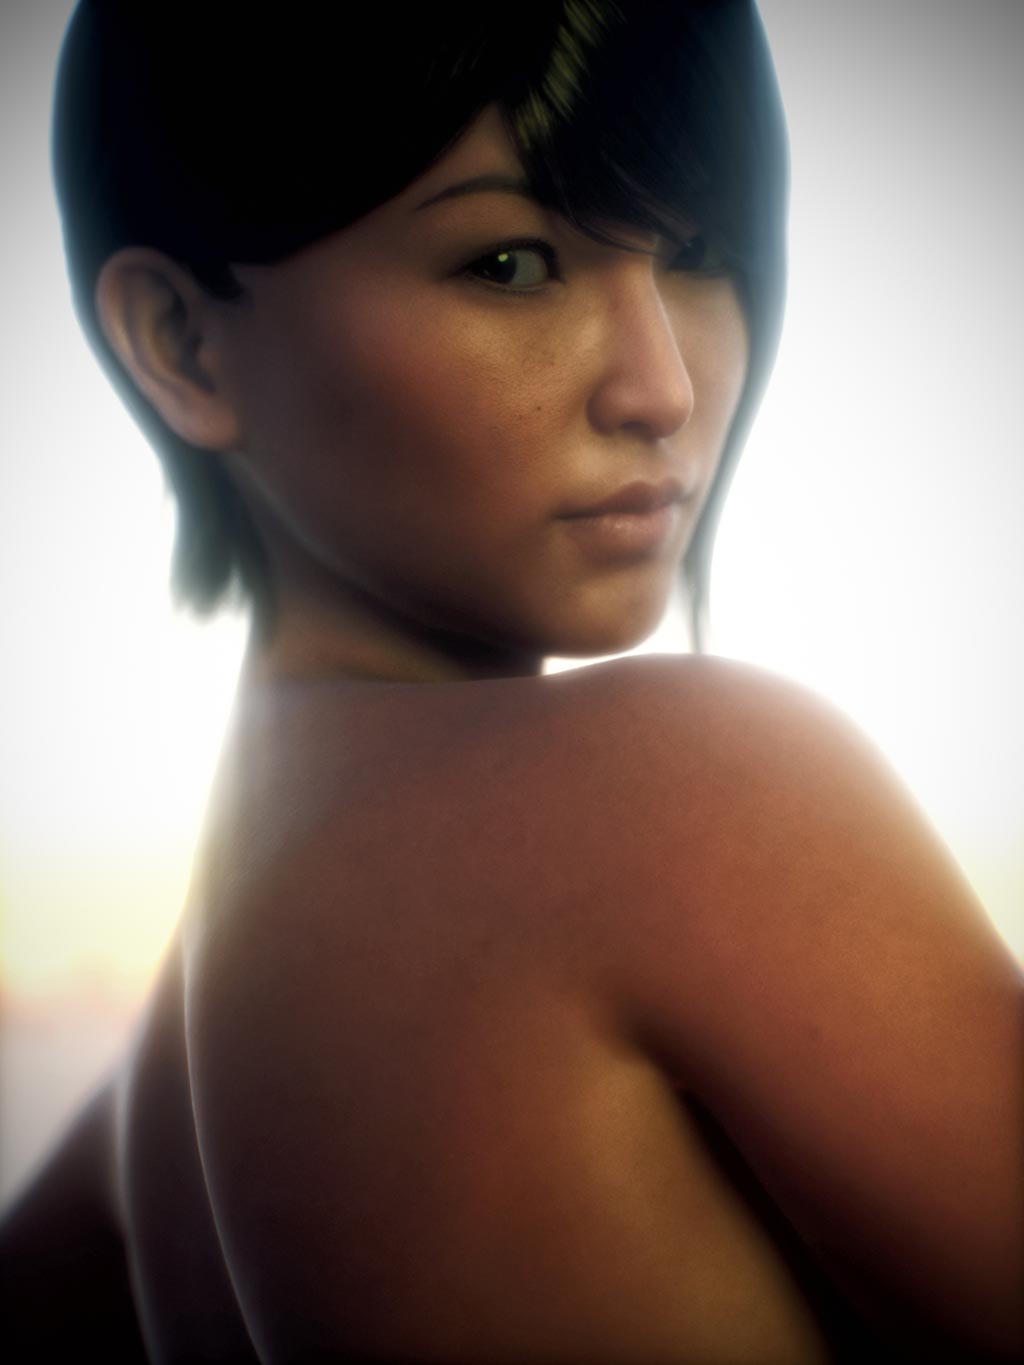
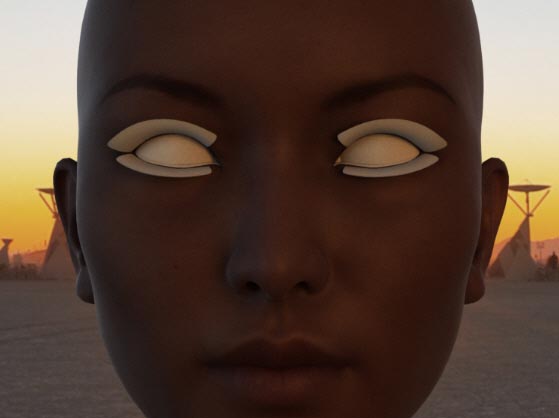
In this tutorial, I will use the Mei portrait image below as an example.

  1. Start by downloading this .duf file.
  2. Open Daz Studio.  If the plugin is installed correctly, you should have the following icons in your toolbar Daz_Studio_Octane_Skin_Shader_Tutorial1/li>
  3. Make sure the icon on the right is set to ‘Duf’ (click on it to cycle through the options) – this setting will make sure that all Octane settings and materials from the Duf file are loaded (Manual loads no Octane settings, Auto will try and build materials based on the settings within Daz).
     
    The left icon is for the Main Octane Settings, the middle opens the render viewport.
  4. Unzip and open the SkinShader.duf file you just downloaded.  You should find a simple scene with a Sphere primitive.  If you open the render viewport the sphere will be rendered, but will be quite dark and not look very much like skin at the moment.
  5. Now import a model – I have used Genesis 3 model (Mei Lin 7) in this example but you can use any model you have. Note that the available surfaces will be different for earlier generation models, but the same principles will apply – e.g. Torso in Gen 3 is Head, neck, hips etc. in Gen2.  For best results try and use a model that has a diffuse map that is photo-referenced, and not hand painted – Mei Lin 7, Olympia 7, Michael 7 and Michael 6 are good examples.
  6. With your chosen model loaded, open the Octane Settings window, and select the materials tab.
  7. The left part lists all available/used materials, the middle part lists current scene models with their available surfaces. When you select a surface a yellow dot will show you which material is attached.

  8. Now apply the skin material to the model – click and drag SkinShader from the left and drop it on the Face surface.  Apply the same material to the Lips and Ears.  You can now delete the sphere from within Daz Studio.  It should now look like this:

Now you have the material applied open the render viewport.  It will still look a little dark and not skin like yet.  We need to add a few more  things to the material using the Nodegraph Editor (highlighted with a red rectangle in the image above).

Exploring Our Octane Skin Material

When rendering an object using a PBR (physically based renderer) like Octane, the material needs to replicate its real world equivalent.  With skin this involves creating layers for the deep scatter (blood vessels), hypodermis & dermis (fatty tissue), and epidermis (the outermost layer).  At the very least I feel you need the first and last if you want that lovely red translucency (scattering) in the ears. 

One way is to generate independent layers on the model (each with its own material), but this is cumbersome and from my experience does not add anything.  I prefer to generate all the layers within one material.

I do this by combining different nodes.  Octane has four primary nodes – Diffuse (solid matt surface), Glossy (solid shiny surface) and Specular (clear or transparent surface).  The fourth is a Mix Node where you can combine two or more of these surface nodes.

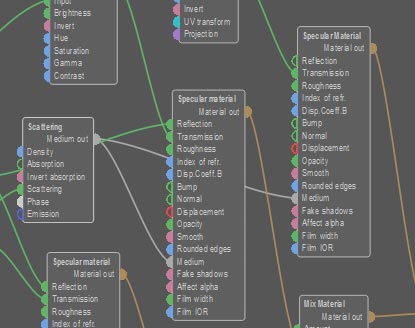
The above is the node structure of the skin material I used in the Mei portrait.   Nodes 2 & 3 are adapted from the amazing skin material developed by TonySculptor (freely available in the Octane library) . I have added the other nodes around it, and they loosely represent the layers of skin as follows:

  1. Specular Material (blood vessels, or deep scatter)
  2. Specular Material (skin mid-layer)
  3. Specular Material (skin mid-layer)
  4. Diffuse Material (skin surface)
  5. Displacement map (add texture and definition to the surface)
  6. In isolation, each of the five nodes will look like the following (Figure 6 is all combined):

    The additional nodes in the skin material are:

  7. Output node – the item/s that the material is applied to
  8. Mix material node – used to combine two material nodes
  9. Image node – used to place an image within a marterial
  10. Colour node – used to set an RGB/Greyscale setting to a node
  11. Scattering node – used to set the scattering parameters for specular or diffuse nodes

Note however, that our current skin material does not contain any texture maps. We will need to put in appropriate texture maps according to the nodes described above.

In particular, there is a Diffuse map in the 4th picture – let’s go ahead and put that into the skin material.  Select the RGB Image node connected to the Diffuse node. The following settings should appear on the right of the editor:

It’s all set to receive the diffuse map – simply select the drop down list and either Browse to the diffuse map location, or (if loaded) from the map list that is generated (in this example, the maps available for Mei are offered).  I want the MeiLin7FaceD_1001.jpg image.

Now let’s return to the Material tab and generate two more skin materials – one for the torso, and one for the arms.  Right click on the SkinShader material and Copy as new material.

A copy will be created in the unused section (blue – not assigned).  Now drag this material over to the torso surface to assign it.  With the torso selected, open the Nodegraph editor and change the diffuse map we set before to the appropriate Torso diffuse map image.  The RGB node should now look something like this.

Repeat this again for the arms. We can ignore the legs and nails as they will not be visible. Your completed skin material list should look like this:

You can right click each material and rename it if you wish, always useful when scenes get more complicated.  You can also save them as pre-sets so they are available in other projects.

We Are Done!

Congratulations! You have just created a Daz Studio Octane skin material. Open the render viewport again, and the image should start to look more like skin now.

To transform this image to a finished portrait, we will need to work on setting up displacement, lighting the scene and then setting up the camera. We will discuss how to do this in our next Octane tutorial.

Past Patreon Rewards

$
0
0

Evergreen Tier 4+ Patron Freebies

Iray Material Presets for:

November 2015

Featured images, scene files, and PSD files –

November 2015 reward art and scenes for ShibaShake Patreon

December 2015

Featured images, scene files, and PSD files –

December 2015 reward art and scenes for ShibaShake Patreon

January 2016

Featured images, scene files, and PSD files –

January 2016 reward art and scenes for ShibaShake Patreon

February 2016

Featured images, scene files, and PSD files –

February 2016 reward art and scenes for ShibaShake Patreon

March 2016

Featured images, scene files, and PSD files –

March 2016 reward art and scenes for ShibaShake Patreon

April 2016

Featured images, scene files, and PSD files –

April 2016 reward art and scenes for ShibaShake Patreon

May 2016

Featured images, scene files, and PSD files –

May 2016 reward art and scenes for ShibaShake Patreon

Shiba Shake on Patreon

How to Set-Up Camera, Lights, & Displacement in Daz Studio Octane

$
0
0

This article and all of the images within were created by the very talented Brian Sains. Copyright © Brian Sains. Check out his gallery here.

What I want to achieve here is to give you the ability to set up a simple light rig and basic camera within Octane. I also describe how to add in displacement maps for increased realism.

In this tutorial, I will continue to use the Mei portrait image below as an example. For more on how I created a realistic skin shader, please refer to this tutorial. If you are new to Daz Studio Octane, there is an introduction article here.

1. Daz Studio Octane Lights

Lighting in Octane can be achieved from the Environment Tab (Octane daylight environment or HDR Texture environment) and through emissive textures.  For my image, I used a single emissive key light and an HDR image (Playa Sunrise) from the fantastic sIBL archive.

Open the Environment Tab, set the image to the Playa Sunrise HDRi and adjust the settings as shown below (making sure the Gamma is set to 1).  That’s all you need to do to set up the environment light.  You can rotate the image using the Translation X setting. This is best done with the render window open and all objects hidden (from within Daz).  I will leave it as it is, because I want the sun in the image as the back light for my subject.

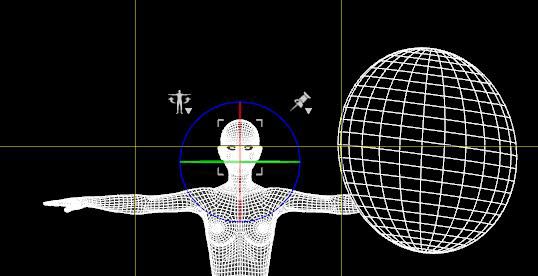
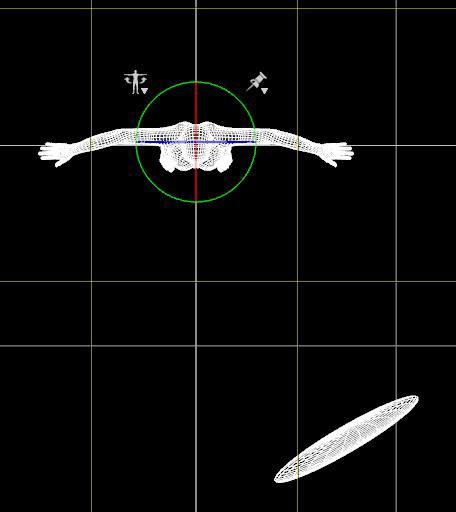
Now let’s set up a simple emissive light in the scene.  Most people tend to use a plane primitive for emissive lighting, but I prefer to use a flattened sphere as a key light (I prefer the reflection you get in the eye).  I place the primitive as illustrated below.

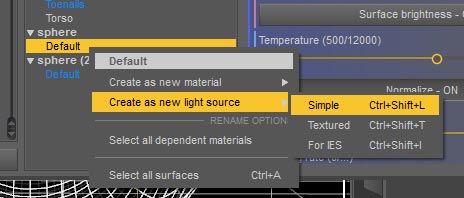
To create the emissive material you need to return to the Octane material tab.  Right click the Sphere primitive and select Create new light source > Simple.

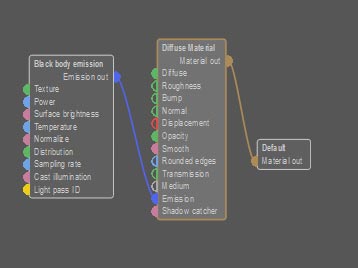
Open the newly created material in the Node editor, right click on the diffuse node and select Smart Unfold.  This breaks down a node into its constituent parts so you can see how it is built.  As you can see, an emissive texture is simply a Blackbody Emission node plugged into a Diffuse node (you cannot have an emissive glossy or specular material).

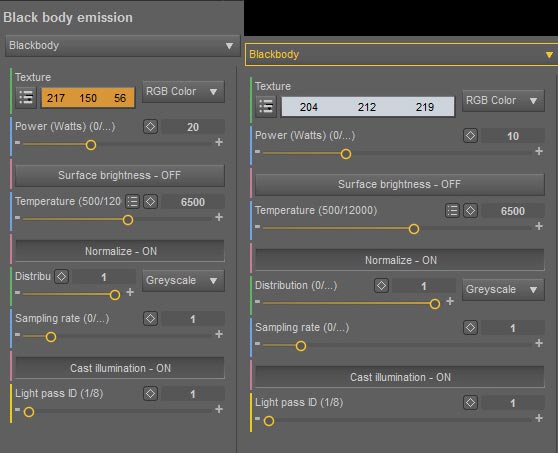
Select the Blackbody node and update the settings as is shown in the left image below. The orange texture colour is from the horizon of the Playa HDR image, selected using the colour picker tool that is available when you edit the colour.  If you like, repeat the process and create a second primitive to the left side of the character as a fill light. This time select the blue colour from the sky in the HDRi (below right).

Now, we can fine tune our lights from within the render viewport itself, even when the image is rendering.  Let’s start with the Camera Imager and Post Processing tabs. The following are the settings I used in my Mei portrait:

Choice of settings in the Camera Imager comes down to personal preference.  As I have said previously, I’m a big fan of the Agfachrome, Ektachrome and Kodachrome filters.  I also find adding bloom improves the natural lighting and softens the image.

2. Daz Studio Octane Camera Settings

  • Create a camera in Daz and make sure that it’s selected within the Daz viewport.
  • Position it so the face is in full portrait view.
  • Now open the Octane viewport again.  Use the ‘Autofocus’ tool to select an area of focus (I tend to use the eye or nose as my focal point). This gives us a nice quick DOF effect.
  • To adjust the degree of focus, you need to select the camera within Daz and open the Cameras pane.  Use the Aperture Diameter setting in that pane. I usually set it between 5-15mm (the f-stop is altered automatically).
     
    I am sure this will probably cause photographers to scream “that’s not how to do it!” – but it works for me 🙂

3. Daz Studio Octane Displacement Maps

Some of you may have noticed that in the skin tutorial, we only used a diffuse map – no bump, normal or displacement maps.  The reason I leave it to now is that I prefer to use displacement maps, which can slow down render time. Therefore, I wait until I am happy with the scene, then add displacement and tweak as necessary.

I used a displacement map in the Mei portrait.  It needs to be a greyscale image and ideally 4k and above.  In this case I used the standard bump map that came with Mei 7, but in the past have used dedicated displacement maps (though rarely supplied) or have made my own from the diffuse map ( tutorial on making displacement maps ). 

The important thing here is that the black parts of the map are the parts that depress into the object (like pores) and the white bits extrude (like spots or eyebrows).  Ultimately, I find a displacement map produces a much better result as it physically alters the shape of the object, thus giving you subtle shades and shadows.

To add a map to the displacement node, return to the Material pane in Octane and open the face material in the node editor.

You will notice there is already a greyscale image node waiting to be filled. This is attached to the displacement node, which in turn drives the displacement for the combined nodes before being applied to the surface.  If you have a bump map that has white eyebrows and black pores then you should be able to use it here.  Use the grayscale image node to load the bump map.

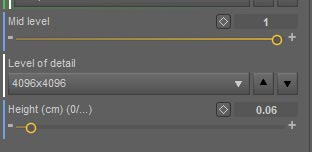
Next, select the Displacement node and check the level of detail corresponds to the image you have used (normally 4k).  The only other adjustment required is the height.  This is very sensitive, and you wouldn’t want to go beyond a height of 0.12cm. 

The image below shows (from left to right) no displacement, 0.06cm and 0.12cm.

You will need to go back and update all of your skin materials for torso and arms accordingly, and make sure they are set to the same mid-level and height (but with different image maps). Otherwise, the seams between the UV areas will become visible.

I have found that adding bump or normal maps alongside a displacement map adds very little if anything.  However, displacement maps can be very fiddly and more render intensive.  If you wish to use a bump map then create a new image node (greyscale with a gamma setting below 0.1) or normal map (RGB image node) and attach it to the appropriate connecter on the 3 specular and 1 diffuse nodes.

In the next tutorial I will cover a couple of other node adjustments you may find useful, and then cover briefly the other materials I used in the Mei render.

3D-Art Contest Winners ~ May 2016

$
0
0

My favorite April item has got to be Mei Lin 7. Luckily, March Madness was extended, so we could get her packages at a pretty good price. I don’t have her HD add-on yet, but I am definitely going to get it when it goes back on sale.

There certainly were many Mei Lin 7 renders in the Daz Gallery last month. In fact, almost half the pictures I made in April were of Mei Lin. A beauty like this needs an equally beautiful companion, and what better friend than an Asian tiger cub! Therefore, this May, we will feature Mei Lin 7 and Alessandro_AM.

A girl also needs beautiful textures to wear and interesting places to visit, so our two other vendors are Anna Benjamin (fashion texture extraordinaire) and ironman13 (sets and pose genius).

May 2016 Contest Vendors

Alessandro_AM
Anna Benjamin
ironman13

Images with the newly released Mei Lin 7 and Lee 7 will also qualify.

May contest entries.

1st Place – Defender of the Forest

Artist – Storypilot

Wow! Fantastic!

Straight away I get drawn into the action of the piece. The blurring effect is outstanding. It creates a strong feeling of danger and tension, where everything seems to be getting sucked into the creature’s big maw. We cannot help but feel strongly for the wolf who is defending her home from this evil alien presence.

Brilliant use of colors. The red alien creature stands out well against the blue backdrop, and its color and texture make it look more threatening. The wolf is marvelously posed and the superb camera angle intensifies the entire scene.

Masterful use of pose, camera, colors, shaders, and post-effects to capture a wonderfully dynamic story moment. Bravo!

2nd Place – Love and Security

Artist – Shozai

I absolutely love all the tender, funny, and happy moments that Shozai captures in her amazing animal artwork.

This image is brilliant! The elephants’ poses and expressions convey a perfect feeling of contentment and happiness. One cannot help but share in that feeling, and want to protect it.

The dappled light on their bodies is beautiful, as are the blue and green hues, which further accentuate the peacefulness of the scene. This is both visually and emotionally spectacular!

Make sure to view May’s submissions for many more delightful and majestic moments captured by Shozai.

There was just a butt-load of amazing artwork this month, so a big congratulations to you all. The judges were unable to pare down their favorite entries, so we have a three way tie in third place, and lots of honorable winners! Get ready for the awesomeness!

3rd Place – Stampede

Artist – Budo-san

Magnificent scene and snow effects. One can almost hear the thundering sound of gigantic feet and feel the ground shake. A truly wonderful showcase of Alessandro_AM’s marvelous Woolly Mammoth.

3rd Place – Walking alone

Artist – MikeD

The lone wolf, making his way bravely through adversity. This image speaks strongly to us all as we go through life’s challenges. We hope to face them with courage, dignity, and grace, all of which are captured here in AM’s magnificent wolf. Excellent concept, pose, environment, and seamless integration with Ron’s Magical Snow brushes.

3rd Place – Nile Ballet

Artist – Joe Webb

A gorgeous, playful, and wonderfully creative image. The crocodiles are beautifully posed, basking in the sun. They are to one side, while the hippos are on the other, thus creating the fascinating interplay of the Nile Ballet.

The dance of light on water creates another compelling visual all on its own. Love the composition, love the backdrop, love the lighting, love everything about this stunning work of art.

Honorable Mentions

Defiance by mugzie101

A superb fantasy character featuring the Eternal Desert Warrior Outfit by Anna Benjamin. Great looking pose, combination with the bow, and very sultry expression. All in all a captivating promo image, which would certainly get me to cart and buy.

Washing Day by knaakie

Hahaha! Love this! As Arnold would say, …

Punk: Wash day tomorrow? Nothing clean, right?
The Terminator: Nothing clean. Right.
~~[The Terminator]

A very clever piece of art with fabulous camera angle, framing, and depth of field. Always love your work, ingenuity, and humor. Ironman13’s Laundromat Environment is looking very hot and spicy!

Old Pirate by luci45

A remarkable character portrait featuring the Crimson Seas outfit and textures by Anna Benjamin. Excellent lighting that draws our attention straight to the face, which is rich in detail, expression, and sporting an excellent beard. We want to hear the many exciting adventures that this old sea dog has to tell, starting with the one about the great big gem!

Samurai Temple by Jaellra

Yay! A Lee 7 render!

Awesome composition, lighting, and effects. Love how smoothly Ron’s brushes are integrated into the scene, as well as the pose and backdrop. Terrific use of materials, especially the light reflections on the ground. Outstanding image!

Mesmerized by Ferretmania

The viewer’s attention is instantly captured, by the expression of terror on the girl’s face. I like how everything is darkened so as to quickly draw one’s eye to where the action is. Incredible expressions, posing, and story-telling.

Rabbit and Steel: Together Again by Ippotamus

A dynamite image, with great characters, story-telling, and whimsy. This would make a terrific comic book series!

As soon as I saw the samurai bunny, I loved it! The girl’s pose and outfit are superb, as is the cool looking scooter. Great color blends of blues and yellows, and an awesome backdrop. Everything fits perfectly together in this charmingly creative composition.

Thank You and Congratulations!!

Winners, please post a comment below with a valid e-mail in the comment e-mail box. This is what I will use to send you your DAZ GC code.

Many thanks to you all for joining us on this journey and making this contest interesting, illuminating, and fun! We hope you will all join us for another year as well as give us suggestions and thoughts for improvement. See you in our June 2016 contest!

Advanced Skin Material Settings for Daz Studio Octane

$
0
0

This article and all of the images within were created by the very talented Brian Sains. Copyright © Brian Sains. Check out his gallery here.

Sub-surface scattering (SSS)

In the introduction to this series I explained how Physically Based Render engines work – simulated light bouncing around interacting with surfaces.

SSS is the process that defines –

  • How light passes through a translucent object,
  • How it interacts with the properties of that object, and
  • How it exits the object (at a different point – hence scattered).

In practical terms, particularly with skin, it is the effect where you see light pass through extremities like the ear, producing a reddening glow.

That is about as far as I can take the science, so let’s look at how SSS is controlled within Octane.  SSS is applied to a material node using a scattering node, which can be applied to both diffuse and specular materials (but not glossy ones).  If you look at the skin shader material in our previous skin tutorial, you will see there is a scattering node attached to all four material nodes (3 scattering nodes, as one is shared between two specular nodes).

The diagram below shows the three scattering nodes controlling (from left to right) the skin’s deep/mid layer, the mid-layer and the surface layer.

Octane Scattering Node Settings

1. Density

Density controls how fast light travels through an object, the higher the value the faster it travels (a value of 0 would result in no scattering).  My interpretation of this is that the higher the value, the deeper light can penetrate a surface.  When using other materials, particularly those from the online database, I have found this setting to be very low.  It is very dependent on the size of the model, and therefore the scale used within Daz.  Normally these materials have been developed for use within other 3d applications with a different scaling system, which is why they tend to be set lower.

2. Absorption

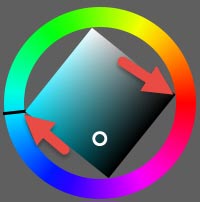
This setting defines which light is absorbed faster, in the case of the 3rd node it’s a green/blue.  It took me a while to get my head round this, but essentially the effect is the scattered light will be the opposite of this colour (from a wavelength perspective).  The image shown here is from the colour picker within octane – a colour set to absorb blue will scatter as red.

3. Scattering

Scattering is similar to absorption, but defines the speed at which light will be scattered when it passes through an object.

4. Phase/direction

This controls the direction the light is scattered:

  • 0 – light scattered the same amount in any direction
  • 1.0 – more light continues to travel in the direction it was originally traveling
  • -1.0 – light backscatters in the direction it came from

5. Adjusting the scattering nodes

Sadly there is no one definitive setting that will work across all objects. It very much depends on scale, lighting, position, kernel settings and so on.  It is very much a case of trial and error, and an area I still need to work on.

Practically, you may not need to worry about this setting too much, for example if the object is distant or if the ears are covered.  But if you do need to, it’s a juggling act between getting the right amount of scattering across all skin materials. 

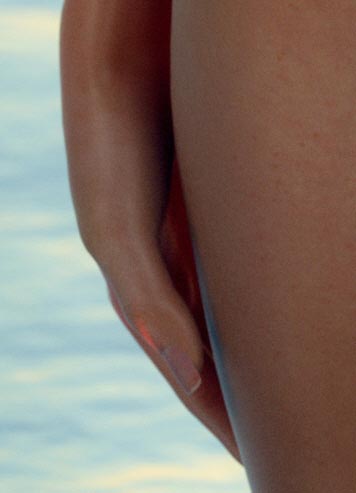
Note – any changes you make to one material (e.g. ears) will have to be adjusted in other skin materials (e.g. arms), otherwise the change will be visible in the UV seams.  Consider the girl with the red ear above – she was one of my first attempts at SSS.  Now look at her hand …

Light wouldn’t scatter like that through a hand.  As a result I tend to pose a model with the hand next to the ear, and then adjust the density (starting with the deep scatter node).  Density (from left to right) 1, 250, 500.

Glossiness

The last area I would like to cover regarding the skin material is gloss/reflection.  This is for subtle gloss effect, so you wouldn’t use this for a wet skin look, but more for areas like the lips, nails, lacrimals, or eye socket. 

Gloss is controlled in Octane using the Roughness setting in both specular and glossy nodes, but is not available in diffuse nodes.  The scale between 0 and 1 determines the level – the lower the roughness, the more glossy/reflective the surface.

Let’s consider a practical example using the lips.  The lips are currently sharing a material with the face and the ears, which is no good as we don’t want a shiny face! 

  • Return to the Material tab and select the Lips surface.
  • Select the material assigned to the lips and copy as a new material.
  • Now apply this new copied material to the lips. It now has its own material that we can edit.

You can get away with this with the lips as they have a clearly defined line between the surrounding face surface, so the seam is less obvious.

With the newly assigned lip material selected, open the node viewport.  I have found, surprisingly, that the best place to adjust the roughness for the lips is in the uppermost scattering node (the one for the deep scatter), which to me, sounds counter-intuitive.  The image below shows the lips with roughness set to 500,250 & 0 (top to bottom).

Finishing up in Daz

Octane comes with a free online material database containing 100s of organic and non-organic materials.  I used the auto-material function in Octane for the eye-lashes. This feature takes the surface settings from within Daz and tries to convert them into Octane. The results vary, and it struggles with iRay materials (though it is getting better). Within the Material tab, right-click the item and select Create new material > Auto Material.

The other materials I used in the Mei portrait are:

  1. Cornea and Eye Reflection – Clear cornea shader  (Octane database)
  2. Eyelashes – Auto-material
  3. Iris – RedSpec
  4. Pupils – RedSpec
  5. Sclera – TonySculptor Sclera (Octane database)
  6. Hair (Actual Hair 2) – RedSpec Hair Shader

The RedSpec materials are part of a set purchased from a 3rd Party.

I used the iRay OOT Hair Shaders for colour and transparency maps.  I sometimes increase the smoothing value within Daz for hair as well.

I have always had a real dislike of the Tear object around the eye, which is now part of the eye moisture object in Genesis 3 characters.  I remove it in Daz by using the geometry tool.

  • Click anywhere on the tear.
  • Right-click and do Geometry selection > Select connected.
  • With the tear now selected (see image below), you can right click Geometry assignment > Create surface from selected.
  • Name it, and then repeat with the other eye.
  • I then apply a null-shader (diffuse node with no settings, and opacity set to 0) to the tears, and there you have it, no more tears!

Summary

So that’s it for Daz Studio, Octane, and skin.  I still have some work to do, in particular on skin reflection, index of refraction, Fresnel effect, falloff textures and more.  I also want to break down the material a bit more and make it more processor efficient.

Having spent so much time on the skin, I also need to work on bringing the standard of my other materials up to scratch. You will notice many of my models don’t smile, simply because I am yet to develop a material I am happy with. Same goes for clothes.

Thank you for visiting my Daz Studio Octane tutorials. Hope you enjoyed them.

This article and all of the images within were created by the very talented Brian Sains. Copyright © Brian Sains. Check out his gallery here.

3D-Art Contest Winners ~ June 2016

$
0
0

How time flies! We started this contest a year ago, and we are so happy with the wonderful entries we get every month. Thank you all for joining in, visiting our contest pages, and sharing your fabulous artwork with us.

Here are the vendors we featured in our first year!

3D Universe
Alessandro_AM (2)
Anna Benjamin
The AntFarm
AprilYSH
Arki
Daz Originals
Design Anvil
DzFire
FirstBastion
Fred Winkler Art (2)
Goldtassel
Ignis Serpentus
ironman13 (2)
Jack Tomalin
Lady Littlefox
Luthbel
Luthbellina
outoftouch
Predatron
Raiya
RawArt
RuntimeDNA Daz Store
Sabby
Sarsa
SHIFTING IMAGES
Shox-Design
Silver
Sixus1
Stonemason (2)
SWAM (2)

Valandar

In celebration of the new contest year, we will pick totally new vendors that we haven’t featured before.

June 2016 Contest Vendors

Cake One
Danie & Marforno
Orestes Graphics

Images with the newly released Kalea 7 and Kimo 7 will also qualify.

June contest entries.

1st Place – Little Cheater

Artist – knaakie

This series of images with the Hob Goblin is just crazy funny. The judges had a difficult time picking a favorite and so did I!

I finally settled on this one which has marvelous story-telling, action, expressive poses, and depth. The image captures everything so well that no additional text is needed. In addition, the main character comes through as very lovable even though he is a rogue. 🙂

It is rare to see an image that is so naturally and eloquently posed. It makes an already great image into an excellent one. You definitely want to check out more of your favorite Hob Goblin adventures here!

2nd Place – Some Enchanted Evening

Artist – Areyna

This looks like a book cover!

The fantastic colors and lighting quickly grabbed my attention, and the awesome characters held it. Especially love the glow on both their hair, and the incredible romantic setting.

Her come-hither look and great details like his gold chain and cigarette, make this into another outstanding story-telling piece. I would definitely buy this book!

In addition, Kalea looks lovely here, so it would also make an amazing promo image.

3rd Place – Blackbird Tattoo

Artist – Kismet2012

What a terrific concept!

The tattoo is excellent. I like that it is a bit faded, which makes it blend naturally and realistically with her skin. Pose, jewelry, and hair, complements the tattoo perfectly, showing both grace and beauty. In addition, skillful use of blue in the jewels, background, and lighting, further enhances the picture and brings out the blue of her eyes.

An exquisite portrait, with many interesting elements, all of which are working in harmony to express elegance and style. This would have made another great promo image of Kalea.

3rd Place – Thinking

Artist – liquidsnake4ch

I was immediately drawn to the beautiful angel with radiant wings. She seems vulnerable, pensive, and a bit sad.

DM’s Grotto looks exceptionally fine here. The materials and lighting are perfect, and it complements the angel marvelously. Both cross and structure contributes to the mood of the piece, but doesn’t compete with the primary figure. I especially like how the cross shows in-between her wings.

Finally, the tilt of the camera provides further artistry and creates an overall fantastic image.

Honorable Mentions

Peaceful by Sasje

What strikes me first about this image is the superb framing and camera angle. The borders of the image wraps around DM’s Elder Rock, and the rocks perfectly wrap around the figure. The sharp bottom-up angle of the camera differentiates the image, and the little bird balancing on his finger finishes the piece off with balance and finesse.

Brilliant composition and camera work.

Cosmic Opal by Jaellra

Love the combination of outfits to create something totally unique and creative. The hair also fits the ensemble very well, and everything fits splendidly with the beautiful background. Great combination of cool colors with her warmer hair and skin. This is all topped off by the cool energy ball effects around her hands.

Incredible character and colors.

“Cooling Off” VA June Entry #2 by Hemms

Wonderful feature of DM’s FIT ‘n SEXY Outfit. I like how the colors of her hair and outfit fit with the colors in the background. Also great glow on the figures’ hair.

Definitely a cool looking duo.

Girl From Japan 8 by LaMuserie

Who doesn’t love a cute ninja cat girl!

Just a fabulous character and terrific feature of DM’s Sensual Aiko 6 – II poses. Love the depth of the scene and the subtle warm highlights on the girl and dagger.

Many Thanks and Big Congratulations!!

Winners, please post a comment below with a valid e-mail in the comment e-mail box. This is what I will use to send you your DAZ GC code.

We always have great fun going through the images so thank you all for participating. See you in our July 2016 contest!


Daz Studio Lighting – Beginner to Now

$
0
0

I have gone through several big changes in my 3d-art lighting setup. Here, I talk about my Daz Studio lighting journey, from the simple headlamp to what I use in Iray today. I discuss why I made each change, and what I found to be the advantages and disadvantages of each.

Remember, however, that good lighting is dependent on the type of images that are created. I mainly create character based 3d-art, where there is a central figure(s) (e.g. person, animal, alien, robot) that is the main focus of the image. There are surrounding elements and an appropriate backdrop, but they are all in support of the central figure.

As a result, my lighting setup is also geared towards those types of images and may not be as appropriate for other types of renders, such as those that focus on landscapes, architecture, or large-scale scenes.

1. Headlamp

When I first started creating 3d-art, I spent most of my time on figures and posing. At the time, I didn’t know much about lighting, so I went with what was the default in Daz Studio, which is the camera headlamp.

The camera headlamp is a light mounted at the top of our active camera. In this way, it lights everything in our scene equally (i.e. everything pointed to by our active camera). This makes it very easy to set up scene lighting because –

  • I do not have to manage or add any lights of my own.
  • Everything is lighted well, so my main figures and their faces are not covered by unwanted shadows.

Unfortunately, this type of equal lighting also makes my image appear flat, overly bright, and non-realistic. This was less of a problem when I only used my images in support of my online articles or for creating website headers. However, my goals soon changed.

At the time, there were a couple of contests going on at Daz3D, with some fantastic looking entries. Some entries were artistic and fantasy based, while others were more realistic. However, they all had interesting lighting which set them apart from everything else. These images and their wonderful artists inspired me to start learning more about lighting my 3d-art scenes.

2. Uber Environment Light and Spolights

The first thing that I did, to learn more about lights in Daz Studio, is to use one of the light sets that I already owned. The light set that I applied had an Uber Environment light and a couple of spotlights, so that became my new lighting setup.

A problem that I encountered right-off is that the faces of my primary figures were not bright enough, and were often set in shadow. I quickly discovered that I could solve this problem by cranking up the Uber Environment light.

The Daz Studio UE light is used to simulate environment as well as ambient or bounce light. Environment light is provided by an image that is attached to the UE light. There are also other controls in the UE light parameters to adjust shadows, bounce, render quality, and more. This very simple tutorial has the basics on how to use UE lights in Daz Studio.

The truth is, I never really played around much with Daz Studio’s UE light. All I did was apply a preset light group (I think I used an early one by Dimension Theory), crank up the UE light until my primary figures were bright enough, and that was it.

Note that UE lights only work in 3Delight and NOT in Iray.

The images above are a lot more realistic than the headlamp example. There are also some shadows which give the figures more depth and shape. However, because I am simply cranking up the environment light, the image is still fairly flat, due to the consistent lighting. The figures do not pop out from the rest of the environment, and the light is not very interesting because it is bright throughout. In particular, there is not enough contrast between the figures and the background, and also within the figures themselves.

3. Dreamlight and LDPR

At this point in my Daz Studio lighting journey, I saw a picture in the Daz3D Gallery that had wonderful lighting, and used something called Light Dome Pro – R. I was intrigued.

I did some research, and the next time Dreamlight’s store was on sale, I got LDP-R and the DAZ Studio Illuminated tutorial.

Based on the beginner skill level I had at the time, I learned a lot from the tutorial. I now started learning how to add glow, tint, depth, and better contrast to my pictures. Compare the image below and my previous images, and you can see a marked improvement.

Some things that I learned from LDP-R and Dreamlight’s tutorial-

  • I learned how to add glow and tint in postwork (Photoshop).
  • I learned how to render my light sources into different layers and do fast lighting adjustments within Photoshop.
  • I learned how to create interesting shadows and contrast with a distant light (mimicking sunlight).
  • I learned how to properly light my main figures.

In my scenes, I would have the sunlight from LDP-R, and I would add in some spotlights to accent my figure according to the 3-point-light system. Occasionally, I would add in some environment lights if I want to accent anything in the background.

Next, I would render everything into layers using the LDP-R system. Then, I bring everything into Photoshop where I can further manipulate the strength of each light through Photoshop’s powerful layering system. Once that is done, I run the Miami Filter action which comes with the LDP-R package. This action adds glow, tint, and a vignette effect to my Daz Studio render.

Although I no longer use the Daz Studio portion of LDP-R, I still use its Miami Filter action in many of my renders today to add glow and tint.

4. Colored Lights and Light Rays

One of the things that was still missing though, is color. I enjoy doing fantasy type 3d-art, and much of the fantasy artwork that I admire, not only has great high contrast lighting, but also very saturated colors. Therefore, I wanted to explore using colored lights and also those cool looking light rays.

This was where I discovered Age of Armour’s wonderful lights and his Atmospheric Effects Cameras package. The Atmospheric Effects package contains a volumetric camera that allows me to easily render great looking light rays. I would render this in a separate image, and then integrate it within Photoshop.

Note that at the writing of this article, these AoA’s lights and cameras only work in the 3Delight renderer and NOT in Iray.

At this stage, I stopped using the Daz Studio portion of LDP-R, but I continued to apply the lighting principles I had learned previously.

  • I use AoA’s ambient light to illuminate the entire scene.
  • I add one distant light, similar to the sunlight added by the LDP-R system to provide sharp shadows.
  • I add spotlights (according to the 3-point light system) to make my figure stand out.
  • Finally, I add a spotlight to produce my light-ray. I render this light separately using AoA’s volumetric camera.

Soon after, I also discovered Advanced Light Presets for AoA’s Lights by Dimension Theory. These presets provided another way to add more interesting light and color into my 3d-art scenes. Instead of using just one ambient light and one distant light, I would instead use one of the presets in Dimension Theory’s package.

I usually use the distant light presets which contain one ambient light, and three distant lights. Then, I re-adjust the colors of the lights and the shadows, according to the look that I want. Usually I set one distant light up as sunlight, with sharp shadows. All the other lights I leave it at their original soft shadow settings.

In this scenario, I no longer need to separately light my figure with spotlights, as the multiple distant lights provide an interesting enough effect. I may sometimes add a spotlight to brighten my figure’s face, if it is in shadow.

5. Reality Plugin and LuxRender

After exploring colored lights for a few months, I became enchanted with some of the realistic looking renders in the Daz Gallery that were made with the Reality plugin and LuxRender. I won’t go into it in great detail here, because I already have a detailed article comparing the renders that I could make before, and what I can make with Reality and Lux.

From a lighting perspective, there are several key differences-

  • There is no ambient light in Reality/Lux. Bounce light, which is what ambient light tries to simulate, is physically modeled in Lux, thus ambient surfaces and light are no longer needed.
  • The use of distant lights are greatly discouraged since it causes unrealistic illumination. Because I relied very heavily on distant lights previously, this was a big change for me. Instead of using distant lights, I now added mesh lights to illuminate my figure(s) (still according to the 3-point light system).

    Mesh lights provide soft shadows and realistic illumination that takes advantage of the physical realism provided by the Lux renderer.

  • The Reality plugin also comes with a Sunlight object that I use to light my entire scene and provide shadows.
  • Finally, LuxRender has a great light-group mechanism that allows us to save each light group into a different image. This is similar to what LDP-R did for us previously, except that there is great flexibility here in creating as many light groups as we want.

    In addition, unlike LDP-R, we only need to make one render pass, which is a really good thing, since it takes a pretty long time to get a good quality image. I usually leave my renders on over-night.

Note that even though I am using a different lighting system, many of the lessons that I learned before are general, and can be applied to all my 3d-art renders.

6. Daz Studio Iray

Like Lux, Daz Studio Iray is also a physically based renderer. Based on my renders so far, I think that the results of both renderers are very comparable, in terms of quality. However, I have decided to focus most of my energies on the Iray renderer.

  • The main reason for this is because Iray is integrated with the Daz Studio system. As such it will get great vendor support, which we are already seeing in the materials and light sets being offered. For me, this is an enormous advantage over Reality/Lux.
  • The Daz Studio Iray renderer is much faster than Reality/Lux if one has a good nVidia graphics card. For me, the good graphics card is absolutely necessary.

    At the moment, Daz Studio Iray does not have the great light-group feature that exists in Lux. Therefore, I need to manually render each of my lights into a separate image. Because Iray is fast, this is not a big inconvenience and I no longer need to leave my renders on over-night. However, without fast rendering, this manual process would be excruciatingly painful. Ultimately, getting an image done would take much more time than in Reality/Lux.

    In addition, Daz Studio Iray does not have the awesome recovery feature in Lux. Even when Lux crashes, I can recover most of the rendering work already done because Lux intermittently saves out a recovery file.

In short, I mostly use Iray now, because of vendor support and rendering speed. However, without a good nVidia card, I would probably stick with Reality/Lux because of the light-group and recovery features which are both extremely useful.

7. Conclusion

I have gone through many different lighting setups from beginner to now. However, in each step, I learned something new, and many of those lessons are general and can be applied later on.

What I have learned so far from this wonderful journey, is that knowledge is not wasted. I started with something very simple, and then slowly build up my knowledge one step at a time. I learned by looking at images in various galleries, and participating in 3d-art contests. Indeed, my very early images were weak in many areas, but the key is to identify those areas of weakness and learn how to improve on each one.

There are still deficiencies in my 3d-art today, but fewer than before. I have improved, gained some useful knowledge, and created some images that I enjoy looking at.

3D-Art Contest Winners ~ June 2015

$
0
0

Many thanks for joining our contest, whether as a participant or just to enjoy the show. 😀 There were many great entries in June, and the judges had a blast going through them all. Hope everyone had fun and please join us in the July contest!

June 2015 Contest Vendors

Fred Winkler Art
Luthbel
Luthbellina

June 2015 contest entries.

1st Place – The Path Finder

Artist – LKart

Wonderfully creative, with great details, and excellent shadows, which add to the mood of the piece. It features My Camel Camelia and Desert Pathfinders by Luthbellina so magnificently, that it got a special Kudos from the vendor. Great job LKart!!

2nd Place – Locker Room Rumble

Artist – Drakenborg

Love the light and shadows, as well as the flow of this piece. One’s eye is drawn to the protagonist’s face first, which is bathed in light. We see that she is holding a weapon and is ready to attack. Then, we are guided into the locker-room with the zombies. Luthbel’s Horror Survivors – Cris and Long Time Dead are both wonderfully featured. Great tension and anticipation!

3rd Place – Two Minds, One Place

Artist – luannemarie

This piece has great feeling and emotion. The expressions on both girl and horse show a deep connection and love between the two. Fred Winkler’s Neomi is beautifully portrayed. Heart-warming and touching!

Honorable Mentions

Fire by Shawn Booth

Great looking composition, action, and effects!

Corridor by Sorel

Wonderful lighting and glow!

Cathedral Combat by reserv888

Cool story and fantastic effects! Also great use of FW Sassafrat by Fred Winkler Art.

Congratulations to all the winners!!

Winners, please post a comment below with a valid e-mail in the comment e-mail box. This is what I will use to send you your DAZ GC code.

Daz Victoria 7 – Good, Bad, or Meh

$
0
0

Ever since Victoria 7 was released, there has been a lot of chatter about her. This girl definitely made a big splash. The two key improvements of V7 or the Genesis 3 figure that I am most excited about are better articulation and enhanced facial expressions.

However, some argue that she is nothing special, and similar results can be achieved as a morph on G2F. Others acknowledge that there are certainly posing improvements. However, those do not justify yet another generation figure, a mere 2 years after the release of G2F.

Here, I talk about my own experiences with Victoria 7, what I like, some of the difficulties I encountered, how much extra bucks I would have to spend, and most important of all, whether I think V7 is worth the money spent.

Victoria 7 – The Good

1. Victoria 7 looks fantastic!

I don’t usually buy base figures when they get released. I know that if I am patient and wait a few months, I can probably pick things up at a much better discount. However, as soon as I saw Vicky 7, I was very tempted to get her right away. The promo images and the expression packages look absolutely fantastic!

After agonizing over it for 1 day, I got the base figure and Victoria 7 Attitude Expressions by Cake One. I figured that at the very least, I get a “good morph” and a good Iray skin.

2. Expressions make a big difference

The first thing I noticed when playing around with V7, is that the enhanced expressions make a big difference to my renders. A good expression can make a so-so render into a good one, by making the piece more expressive and realistic. Some images are made, just by an expression.

Since I most enjoy doing figure based pieces, the enhanced expression in G3F is a BIG win for me.

3. Clothes transfer pretty well

Another happy surprise is that clothes seem to transfer quite well. I fit V4 and Genesis clothing on a G2F figure first, and then refit that onto Victoria 7. The only items that I had problems with so far are some G2F boots, which get all twisted when auto-fitted onto V7.

Hair also works pretty well, as long as it comes with enough adjustments to move things around based on the figure pose. I just use the hair as a prop, parented to my figure’s head.

This is super great news because I can focus my Daz bucks on expressions and perhaps a bit on new poses.

4. Doesn’t take too much to get started with G3F

The G3F base figure comes for free with Daz Studio 4.8. However, as with previous base figures, it doesn’t look very good. Therefore, getting Victoria 7 base was necessary for me. At the start, I got –

These four products were sufficient to start generating images that I am quite happy with.

Victoria 7 – The Bad

1. Old poses need to be converted

Because of changes in the rigging structure of Genesis 3 figures, old poses will generally *not* work very well. However, there are already two different converters (one by Zev0 & Draagonstorm, and another by 3D-Universe) that allow us to easily upgrade our G2F poses for use in G3F. In addition, Zev0 is working on a batch converter for V4 poses into G2F. Therefore, with these two converters, we can ultimately transfer V4 poses for use in G3F.

However, as expected, the converted poses will not work as well as the original. I usually need to tweak each converted pose that I use, some more than others. I prefer the results that I get when I do not unlock the ZForearm (Z-unlock). As a result, I need to manually get the arms into the right position myself, which takes up more time. Not surprisingly, I get the best results when using poses that are crafted for V7.

A useful tip that I got from this Daz Forum thread is that –

If you want even more accurate hands, we discovered that the G1 to G2 hand preset from Handy Dandy (for Genesis2) works really well on the converted poses for Genesis3.
~~[Zev0]

2. Old skins and characters won’t work

Not surprisingly, old generation skins and character morphs are not going to transfer. It is still early though, so perhaps converters will be created for these at some later date.

3. Spend more bucks rebuilding character, pose, and expression library

Even though the startup cost is not too great, there is no denying that we would need to spend additional money getting characters, poses, and expressions that are designed for G3F, to get the best results.

4. Not Poser compatible

If you look at the Victoria 7 product page, only DAZ Studio 4.8 is listed in Compatible Software. At the current moment, Victoria 7 and Genesis 3 are not supported in Poser.

I do not know what the actual details are for figure compatibility here. According to a comment on this Renderosity thread, it would require some non-trivial updates from Poser.

To even attempt a DSON version would require Poser support industry standard dual quaternion skinning, which is how Genesis 3 is rigged. Note that is just one of the things blocking a DSON version, though it is the most obvious.
~~[bhoins]

I haven’t seen anything on this from either DAZ3D or Smith Micro.

Victoria 7 – Good, Bad or Meh?

Personally, I rather like Victoria 7 and for me, the good outweighs the bad. I like the renders I can make with her, and I think they look more realistic than my older renders. My startup costs weren’t too great, and I am already pretty happy with what I can render so far.

However, art is subjective, and results are going to vary depending on art style and composition.

What do you think of Victoria 7? Are there big advantages or disadvantages that I missed? If so, please share them with us in the comments section below.

How to Insert Inline Images in the Daz3D Forum

$
0
0

Daz3D just updated their forum interface. As with most new things, it took me a while to get used to it, but now, I am getting to like the new interface.

One of the first things that I had trouble with, was how to include properly sized images in my forum posts. I finally figured out how to do this, so this short tutorial gives step-by-step instructions on how to do this with the least amount of fuss. I am using the Chrome browser.

  1. Click on the Attach a file link.
  2. Click on the Choose File button, and select the image file(s) we want to post. This will upload our image files onto the Daz3D forum server.
  3. If we hover our mouse over any of the attached image thumbnails, a small menu will open up below it showing us the file size, and giving us the option to delete the image if we so choose.
  4. Instead, right click on our attached thumbnail and select Open image in new tab. This will open up our thumbnail image in a new tab on our browser.
  5. Go up into the browser address bar and remove thumbnail/ from the URL. This will give us the URL of our newly (large) attached image, on the Daz3D forum server.
  6. After we delete thumbnail/ from our address bar, and hit , we should get the large sized image we just uploaded onto Daz. Go up to the address bar and copy this URL.
  7. Now we are ready to insert the image into our forum post. First, (a) click on the insert image icon in the Leave a Comment interface, at the bottom of each forum page. This will open up an Image Properties popup-window. Then, (b) paste our image URL into the URL box..
  8. At this point, we can also change the width or height of our image so that it is not too large. I usually set the larger of my image width or height to 520 pixels. Changing one, will cause the other to shift accordingly, to preserve the aspect ratio of our image.
  9. Next, click on the Link tab and paste our attached image URL in there as well. Then click on OK.
  10. This inserts our attached image into our forum post. We may then add text around it as we so choose.

Hope you found this mini tutorial to be useful and thanks for visiting!

Daz Studio Iray Tips and Tricks

$
0
0

I am really enjoying the Iray renderer in Daz Studio. It is fast (with an nVidia card), and I like the results that I get. With the release of Victoria 7, there are now some really great Iray skins available. In addition, there have been a lot of vendor support for Daz Studio Iray, including some awesome light sets and material sets. For me, this is the key thing that separates the Iray renderer from Reality/LuxRender.

However, one of the key weaknesses of Daz Studio Iray is the difficulty of finding information on how to use it effectively, and how its’ new features can help to enhance my art. There is a lot of good stuff in the Daz3D forums, however one usually has to wade through pages and pages of images and posts, before getting to anything that helps.

Here, I want to list some of the useful Iray tips and tricks that I learned from the Daz forums, from talking to other Dazaholics, and from my own experiments with Daz Studio Iray. If you know of any additional Iray techniques, please let us know in the comments section below.

1. Mesh Lights

Mesh lights are extremely useful for lighting an Iray scene because it provides soft and more realistic shadows. One of the best ways to get a mesh light in Iray, is to convert a spotlight into a mesh light. We can easily do this by –

  1. Select our spotlight and click on the parameters tab.
  2. Click on Light > Area.
  3. Set the Light Geometry drop-down menu to Rectangle, and set the height and width parameters according to the mesh light size that you want. A larger mesh light will product softer shadows, and a smaller mesh light will produce harder shadows.

And that is it! Our spotlight has now become a mesh light, and the really cool advantage is that we can still change our camera to the spotlight view, and see exactly what it lights. Similarly, we can change a point light into a sphere, so that it produces softer shadows.

I usually use an IBL to provide ambient light in my scene, and multiple mesh-lights to further accent my figure(s). In the scene below, I only used two mesh-lights.

2. Fuller Hair

A common problem that I faced in Iray is that certain hair props or figures may appear very wispy or thin. As I understand it, this is a problem with the hair transparency map not being strong enough, i.e. not white enough.

One very easy way to fix this problem is to –

  1. Select our hair object and click on the Surfaces tab.
  2. Select all the relevant hair surfaces, and look for the Cutout Opacity parameter.
  3. Remove the limits on the Cutout Opacity parameter. To do this, click on the gear icon to the right and select Parameter Settings (see below). Then, un-check the Use Limits box and click Accept in the pop-up box.
  4. Set the Cutout Opacity parameter to a value greater than 1 depending on how much we want to strengthen the visibility of our hair strands. Setting a value that is too high may make things too strong, and lose the wispy look of our outer hair strands.

This procedure works in most, but not all cases. For some hairs, I have found that removing the limits on the Cutout Opacity parameter, causes the transparency map to no longer work. In these cases, we may need to lighten our transparency map in a separate image editing software. This is what I do in Photoshop –

  1. Load my hair transparency map.
  2. Duplicate the transparency map into an additional layer.
  3. Set the layer blending option of my duplicate layer to Screen.
  4. I can change the opacity of this layer to control how much additional volume I want to add to my hair.
  5. Once I am happy with the results, I merge both layers and save the transparency image to a new file.
  6. I replace the transparency map, in the Cutout Opacity parameter, with this new Photoshop-ed image.

I got this tip from Fred Winkler Art. Many thanks Fred! 😀

Instead of mucking with transparency maps and fiddling with hair surface parameters, we can also use UHT Hair Shaders for Iray by Slosh. So far, I am very happy with this product.

  • It is easy to use,
  • I like the extra displacement and shine options it provides, and
  • It produces good results in most of my renders.

3. Shiny Eyes

Eyes appear shiny when the surface of our eye reflect the strong light sources in the environment. Therefore, to get lively, shiny eyes, there has to be one or more properly placed light sources to reflect off of.

For example, in the hair examples above, her eyes are shiny because they are reflecting some of the strong light areas in my IBL (image based light). Rotating my image map differently, will result in different eye reflections.

Sometimes, our light source may be properly placed, but the area of the eye that it affects (i.e. the area of reflection) may be too small to be discernible in my rendered image. In this case, we may increase the area of reflection by increasing the amount of cornea bulge in our figure.

To achieve this –

  1. Select our figure and click on the Shaping tab.
  2. Open up our figure and click on the Eyes section.
  3. Enter cornea into the search box at the top to filter the shaping parameters that are shown.
  4. Set the Eyes Cornea Bulge parameter to maximum.

4. Metal Shader Textures

One of the early problems I encountered with Iray is how to have my original armor textures show, after I apply an Iray metal shader. For example, I am creating a knight in armor image (A) using Luthbel’s Paladin armor for G2M.

First of all, I just apply the Iray Uber shader to all the objects in my scene.

Next, I want to further refine my armor surfaces. In particular, I want to apply metal surfaces to appropriate parts of my knight’s armor. I also change the cloth surfaces to Iray velvet, and the leather surfaces to Iray leather.

In the next image (B), I Ctrl-clicked on the Iray Steel-Galvanized metal shader, so that my original textures are preserved, but still, the armor appears a flat shade of silver. All my original texture colors are not showing. Why?!

This is because my armor texture only appears in the Base Color parameter. However, for some metal shaders, there is a much stronger, additional, Metallic Flakes layer.

If I want my original armor textures to show, I will need to load those textures into the Metallic Flakes Color parameter.

  1. I go into the surfaces tab.
  2. I select all the metal surfaces on my armor object.
  3. I note which image map is used in the Base Color parameter, and apply the same image to the Metallic Flakes Color parameter.

After I apply the Base Color image maps to the Metallic Flakes Color parameter, I get a more metallic looking armor with my original textures (C) – Success!!

Next, I can enhance the glossiness of my metal surfaces by –

  1. Setting Glossy Weight to 1,
  2. Removing the image map from Glossy Color,
  3. Setting the Glossy Color to an appropriate color. In this way I can tint my armor to whatever I want. For example, in this composition I want my armor to appear somewhat golden, so I play around with the Glossy Color until I find something that I am happy with. Once I find it, I drag and drop that color into my Custom colors panel so that I can easily apply it to other metal surfaces.

Now that I have all the materials set up properly, I add in some lights to highlight my figure, and then finish with some post-work in Photoshop.

I am still learning the ins and outs of Iray, so if you have more Iray tips, please post them in the comments section below. Many thanks!

Viewing all 279 articles
Browse latest View live